


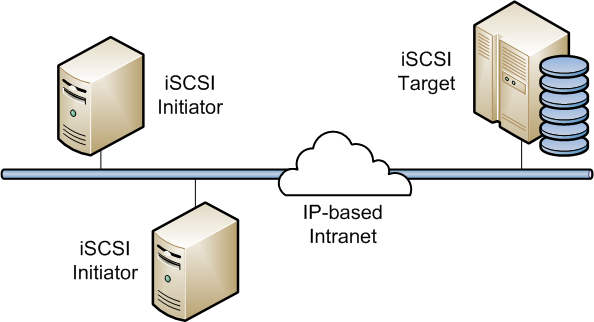
iSCSI stands for Internet Small Computer System Interface is a Storage Area Network protocol that can be used to share block devices such as HDD/SSD partitions, or LVM partitions, or block files on the network. iSCSI works in a client-server model and relies on TCP/IP networks to send SCSI commands between the initiator client and the target. iSCSI Target is a service on iSCSI server that provides access to shared storage and iSCSI Initiator is an iSCSI client that connects to the target and accesses the shared storage.
In this tutorial, we will explain how to setup iSCSI targets and iSCSI initiator on Ubuntu 20.04 server.
Requirements
- A system running Ubuntu 20.04 for iSCSI target with 1 GB external HDD.
- A system running fresh Ubuntu 20.04 for iSCSI initiator.
- A static IP address 192.168.1.10 is configured on iSCSI target and 192.168.1.20 is configured on iSCSI initiator.
- A root password is configured on both server.
Update the System
Before starting, it is a good idea to update your system with the latest packages. You can update them with the following command:
apt-get update -y
apt-get upgrade -y
Once all the packages are updated, restart your system to apply the changes.
Install iSCSI Target
By default, the iSCSI Target package is available in the Ubuntu 20.04 default repository. You can install it by running the following command on the iSCSI Target server:
apt-get install tgt -yAfter installing iSCSI Target, verify the status of the server with the following command:
systemctl status tgtYou should get the following output:
? tgt.service - (i)SCSI target daemon
     Loaded: loaded (/lib/systemd/system/tgt.service; enabled; vendor preset: enabled)
     Active: active (running) since Sat 2020-07-11 07:13:04 UTC; 23s ago
       Docs: man:tgtd(8)
   Main PID: 7770 (tgtd)
     Status: "Starting event loop..."
      Tasks: 1
     Memory: 1.1M
     CGroup: /system.slice/tgt.service
             ??7770 /usr/sbin/tgtd -f

Jul 11 07:13:04 ubuntu2004 systemd[1]: Starting (i)SCSI target daemon...
Jul 11 07:13:04 ubuntu2004 tgtd[7770]: tgtd: iser_ib_init(3431) Failed to initialize RDMA; load kernel modules?
Jul 11 07:13:04 ubuntu2004 tgtd[7770]: tgtd: work_timer_start(146) use timer_fd based scheduler
Jul 11 07:13:04 ubuntu2004 tgtd[7770]: tgtd: bs_init(387) use signalfd notification
Jul 11 07:13:04 ubuntu2004 systemd[1]: Started (i)SCSI target daemon.
At this point, iSCSI Target is installed in your server, you can now proceed to the next step.
Configure iSCSI Target
First, you will need to create a LUN (Logical Unit Number) device on your iSCSI server. LUN is a backend storage devices that is part of a physical SCSI device. All the LUNs mapped to the iSCSI Target are virtually attached to the client’s operating system. Therefore, Initiators can establish and manage file systems on iSCSI LUNs.
You can configure it by creating a new configuration file:
nano /etc/tgt/conf.d/iscsi.confAdd the following lines:
<target iqn.2020-07.example.com:lun1>
     backing-store /dev/sdb
     initiator-address 192.168.1.20
    incominguser iscsi-user password
     outgoinguser iscsi-target secretpass
</target>
Save and close the file when you are finished.
Where:
- The first line defines the name of the LUN.
- The second line defines the location and name of the storage device on the iSCSI Target server.
- The third line defines the IP address of the iSCSI initiator.
- The fourth line defines the incoming username/password.
- The fifth line defines the username/password that the target will provide to the initiator to allow for mutual CHAP authentication to take place.
Next, restart the iSCSI service to apply the changes:
systemctl restart tgtNext, verify the iSCSI Target server with the following command:
tgtadm --mode target --op showYou should get the following output:
Target 1: iqn.2020-07.example.com:lun1
    System information:
        Driver: iscsi
        State: ready
    I_T nexus information:
    LUN information:
        LUN: 0
            Type: controller
            SCSI ID: IET     00010000
            SCSI SN: beaf10
            Size: 0 MB, Block size: 1
            Online: Yes
            Removable media: No
            Prevent removal: No
            Readonly: No
            SWP: No
            Thin-provisioning: No
            Backing store type: null
            Backing store path: None
            Backing store flags:
    Account information:
        iscsi-user
        iscsi-target (outgoing)
    ACL information:
        192.168.1.10
At this point, the iSCSI target server is installed and configured. Now you can proceed to the next step.
Install and Configure iSCSI Initiator
Next, go to the iSCSI initiator machine and install iSCSI initiator package with the following command:
apt-get install open-iscsi -yOnce the installation has been completed, discover the iSCSI target server to find out the shared targets using the following command:
iscsiadm -m discovery -t st -p 192.168.1.10You should see the following output:
192.168.1.10:3260,1 iqn.2020-07.example.com:lun1
Next, you will need to define the name of the LUN device in initiatorname.iscsi file:
nano /etc/iscsi/initiatorname.iscsiAdd your iSCSI Target LUN name as shown below:
InitiatorName=iqn.2020-07.example.com:lun1
Save and close the file when you are finished.
Next, you will need to define the CHAP information that you have configured on iSCSI target to access the iSCSI target from the iSCSI initiator. The node configuration file will exist in the directory ‘/etc/iscsi/nodes/‘ and will have a directory per LUN available.
You can define it by editing the following file:
nano /etc/iscsi/nodes/iqn.2020-07.example.com\:lun1/192.168.1.10\,3260\,1/defaultAdd / Modify the following lines:
node.session.auth.authmethod = CHAP
node.session.auth.username = iscsi-user
node.session.auth.password = password
node.session.auth.username_in = iscsi-target
node.session.auth.password_in = secretpass
node.startup = automatic
Save and close the file then restart the iSCSI initiator service with the following command:
systemctl restart open-iscsi iscsidYou can also verify the status of the service with the following command:
systemctl status open-iscsiYou should get the following output:
? open-iscsi.service - Login to default iSCSI targets
     Loaded: loaded (/lib/systemd/system/open-iscsi.service; enabled; vendor preset: enabled)
     Active: active (exited) since Sat 2020-07-11 07:24:19 UTC; 10s ago
       Docs: man:iscsiadm(8)
             man:iscsid(8)
    Process: 3861 ExecStart=/sbin/iscsiadm -m node --loginall=automatic (code=exited, status=0/SUCCESS)
    Process: 3867 ExecStart=/lib/open-iscsi/activate-storage.sh (code=exited, status=0/SUCCESS)
   Main PID: 3867 (code=exited, status=0/SUCCESS)

Jul 11 07:24:19 initiator systemd[1]: Starting Login to default iSCSI targets...
Jul 11 07:24:19 initiator iscsiadm[3861]: Logging in to [iface: default, target: iqn.2020-07.example.com:lun1, portal: 104.245.33.142,3260] (m>
Jul 11 07:24:19 initiator iscsiadm[3861]: Login to [iface: default, target: iqn.2020-07.example.com:lun1, portal: 104.245.33.142,3260] success>
Jul 11 07:24:19 initiator systemd[1]: Finished Login to default iSCSI targets.
You can also verify the iSCSI connection with the following command:
iscsiadm -m session -o showYou should get the following output:
tcp: [2] 192.168.1.10:3260,1 iqn.2020-07.example.com:lun1 (non-flash)
You can also verify the storage device shared from the iSCSI target with the following command:
lsblkYou should see the shared device sdb in the following output:
NAME   MAJ:MIN RM  SIZE RO TYPE MOUNTPOINT
sda      8:0    0   80G  0 disk
??sda1   8:1    0   80G  0 part /
sdb      8:16   0 1000M  0 disk
Create a File System on Shared Device
In order to use the shared device on iSCSI initiator, you will need to create a file system on the shared device (sdb) and mount it to make this device useful.
First, create a file system on the shared device (sdb) with the following command:
fdisk /dev/sdbAnswer all the questions as shown below to create a file system:
Welcome to fdisk (util-linux 2.34).
Changes will remain in memory only, until you decide to write them.
Be careful before using the write command.

Device does not contain a recognized partition table.
Created a new DOS disklabel with disk identifier 0x9743ddcf.

Command (m for help): n
Partition type
   p   primary (0 primary, 0 extended, 4 free)
   e   extended (container for logical partitions)
Select (default p):

Using default response p.
Partition number (1-4, default 1):
First sector (2048-2047999, default 2048):
Last sector, +/-sectors or +/-size{K,M,G,T,P} (2048-2047999, default 2047999):

Created a new partition 1 of type 'Linux' and of size 999 MiB.

Command (m for help): w
The partition table has been altered.
Calling ioctl() to re-read partition table.
Syncing disks.
Next, format the partition with the following command:
mkfs.ext4 /dev/sdb1You should get the following output:
mke2fs 1.45.5 (07-Jan-2020)
Creating filesystem with 255744 4k blocks and 64000 inodes
Filesystem UUID: e7f06605-a0f5-41e1-b1b2-e85bd7a2d6a3
Superblock backups stored on blocks:
	32768, 98304, 163840, 229376

Allocating group tables: done
Writing inode tables: done
Creating journal (4096 blocks): done
Writing superblocks and filesystem accounting information: done
Next, mount the partition to the /mnt directory with the following command:
mount /dev/sdb1 /mntYou can now verify the mounted partition with the following command:
df -hYou should get the following output:
Filesystem      Size  Used Avail Use% Mounted on
udev            981M     0  981M   0% /dev
tmpfs           199M  588K  199M   1% /run
/dev/sda1        79G  1.8G   74G   3% /
tmpfs           994M     0  994M   0% /dev/shm
tmpfs           5.0M     0  5.0M   0% /run/lock
tmpfs           994M     0  994M   0% /sys/fs/cgroup
tmpfs           199M     0  199M   0% /run/user/0
/dev/sdb1       968M  2.5M  899M   1% /mnt
Conclusion
In the above guide, you learned how to setup iSCSI target and initiator on Ubuntu 20.04 server. You also learned how to share a device on the Target server and access it from the initiator. Feel free to ask me if you have any questions.
Add Comment