


In this tutorial, I will show you how to set up a static IP address on a CentOS 8 server. I will show you three different ways to set up a static IP address by using nmcli, nmtui and by editing the interface configuration file directly.
For this guide, we will set up a static IP address for the eth1 interface on CentOS 8 server. The goal is to set up the eth1 interface with the following details:
- Interface: eth1
- IP Address: 192.168.10.100
- Gateway: 192.168.10.1
- DNS: 1.1.1.1
Prerequisites
For this guide, you will need the CentOS 8 server with some basic tools such as vim and net-tools installed on it. And make sure you have the root privileges, the IP address with details gateway, and have basic knowledge about Linux and CentOS command-line.
Setup a Static IP Address using Nmtui on CentOS 8
On the new version of CentOS 8, there are some major changes related the Networking. For the new version CentOS 8, all configuration related networking is managed by the NetworkManager service. And the NetworkManager provided the TUI (Text User Interface) based application that allows you to create and edit the network configuration, its called ‘nmtui’.
Nmtui is a curses-based tui application for interacting with the NetworkManager. The nmtui is a text-based user interface application, can be run on the Terminal shell for managing the NetworkManager.
First, check the ‘nmtui’ package on the server and make sure it’s installed.
rpm -qa | grep NetworkManagerEnsure you get the ‘NetworkManager-tui’ package on the list.
The ‘nmtui’ package has been installed on CentOS 8 server.
Next, check all available interfaces on the system using the following commands.
ifconfig -aAnd below is the result.
You will get two network interfaces ‘eth0‘ and ‘eth1‘.
And for this guide, we’re going to set up the ‘eth1’ interface with the new static IP address.
To edit the specific interface, you can use the nmtui command as below.
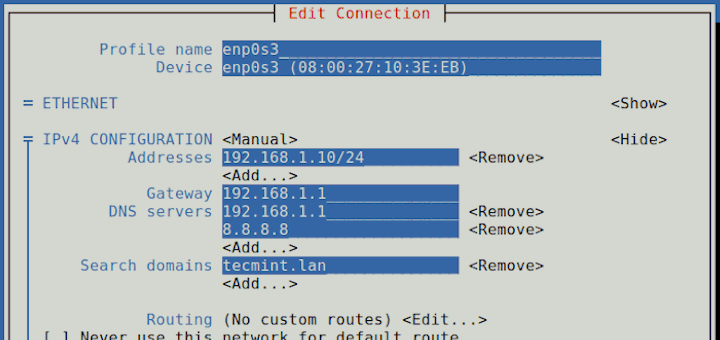
nmtui-edit eth1Now change the IPv4 configuration as you need.
IPv4 Configuration: Manual
Addresses: 192.168.10.100/24
Gateway: 192.168.10.1
DNS servers: 1.1.1.1
             192.168.10.1
Give the 'x' mark on the 'Automatically connect' option
Once all is complete, choose ‘OK’ and hit the enter button. And the new IP address has been assigned.
Next, we need to restart the network interfaces itself for getting the new static IP address.
ifdown eth1
ifup eth1
Now check again the ‘eth1’ interface IP address.
ifconfig eth1And you will get the ‘eth1’ interface with a new static IP address ‘192.168.10.100’, as we assigned through the nmtui.
Setup a Static IP Address using Nmcli on CentOS 8
Another way to configure a static IP address on the CentOS 8 system is to use the ‘nmcli’ program. As known, the nmtui is a TUI (Text User Interface) based application, the nmcli is the command line based application to manage the NetworkManager.
With nmcli you can control the NetworkManager and view its status. It can be used as a replacement for graphical applications such as “nm-Applet”. The nmcli is used to create, edit, delete, enable, disable, disable, display the network status on the server.
Before we configure the static IP address, we check all available interfaces on the CentOS 8 server using the nmcli command below.
nmcli connection show
nmcli
Now below is the result.
As a result’ we’ve two network interfaces on our CentOS 8 server, the ‘eth0’ with the IP address ‘192.168.122.45’ and ‘eth1’ with the IP address ‘192.168.10.105’.
Next, we’re going to change the ‘eth1’ with a new static IP address ‘192.168.10.100’ using the nmcli command-line.
Note:
For the next commands, we will be using the short version of nmcli command options. The ‘nmcli connection modify’ command to ‘nmcli con mod’ etc.
Firstly, we need to change the IPv4 configuration mode on the ‘eth1’ interface to ‘Manual’.
nmcli con mod eth1 ipv4.method manualNow change the IP address and the gateway with the new IP address.
nmcli con mod eth1 ipv4.address 192.168.10.100/24
nmcli con mod eth1 ipv4.gateway 192.168.10.1
Update the DNS server with your own.
nmcli con mod eth1 ipv4.dns "1.1.1.1 192.168.10.1"And enable the ‘eth1’ interface to start automatically on the system boot.
nmcli con mod eth1 autoconnect yesAfter that, restart the ‘eth1’ interface.
nmcli con down eth1
nmcli con up eth1
And the new static IP address of the ‘eth1’ interface has been added. Check using the following command.
ifconfig eth1
nmcli device show eth1
And you will get the result as below.
As a result, the ‘eth1’ interface has a new static IP address as defined ‘192.168.10.100’.
Setup a Static IP Address by Directly Editing the Configuration File
Another way for setting up the static IP address on the CentOS 8 server is by directly editing the network configuration for each interface.
By default, the network interface configurations on CentOS 8 server are located at the ‘/etc/sysconfig/network-scripts’ directory. The directory contains network configurations that managed by the NetworkManager service.
Now go to the ‘/etc/sysconfig/network-scripts’ directory and show all available configuration files.
cd /etc/sysconfig/network-scripts/
ls -lah
Now you will get the result as below.
As a result, w’ve two network interface configurations. The ‘ifcf-eth0’ for ‘eth0’ interface and the ‘ifcfg-eth1’ for the ‘eth1’ interface.
Before going any further, let’s check the ‘eth1’ IP address using the command below.
ifconfig eth1Below is the result.
As a result, the ‘eth1’ interface has an IP address ‘192.168.10.215’.
For this guide, we will set up a new static IP address for the ‘eth1’ interface with the new IP address ‘192.168.10.100’.
On the ‘/etc/sysconfig/network-scripts/’ directory, backup the ‘ifcfg-eth1’ configuration file and create another one.
mv ifcfg-eth1 ~/ifcfg-eth1.backup
vim ifcfg-eth1
Change the details with your own and paste it into it.
TYPE="Ethernet"
BOOTPROTO="none"
NAME="eth1"
IPADDR="192.168.10.100"
NETMASK="255.255.255.0"
GATEWAY=192.168.10.1
DNS1=1.1.1.1
DNS2=192.168.10.1
DEVICE="eth1"
ONBOOT="yes"
Save and close.
Now restart the ‘eth1’ network interface using the following commands.
ifdown eth1
ifup eth1
Ensure there is no error and check the interface using the ifconfig command.
ifconfig eth1You will get the result as below.
Now the IP address of ‘eth1’ interface has been changed to ‘192.168.10.100’. And the static IP configuration on CentOS 8 server has been completed successfully.
And as a result, you’ve learned three different ways to configure the static IP address on the CentOS 8 server.
Add Comment