


Tổng quan
Khi triển khai LDAP trong môi trường thực tế, chúng ta phải quan tâm tới giải pháp backup, tăng tính sẵn sàng cho dịch vụ LDAP. Bên cạnh đó là việc mở rộng LDAP (Scale) đáp ứng lưu lượng cao, bảo đảm hiệu năng, tính sẵn sàng dịch vụ. Để giải quyết vấn đề trên, LDAP cung cấp cơ chế replication để backup cũng như tăng tính sẵn sàng cho dịch vụ.
Replication là tiến trình được cấu hình từ 2 hoặc nhiều hơn service LDAP với mục đích chia sẻ chung nội dung dữ liệu được lưu trữ trong LDAP và giữ cho nội dung lưu trữ được đồng bộ, từ đó có thể cải thiện hiệu năng đọc (có nhiều node cho phép đọc dữ liệu từ LDAP, như master node, các replicate node).
Mô hình thông thường bao gồm 1 node master (Master DAS (Directory Server Agent) hoặc node provider). Node sẽ chịu trách nhiệm duy trì phiên bản dữ liệu chuẩn nhất của dịch vụ thư mục.
Bên cạnh master node là 1 hoặc nhiều shadow server (có thể gọi là consumer, replica, slave). các shadow server giữ dữ liệu của master server. Người dùng có thể kết nối vào shadow server để thực hiện search thông tin cây (DIT)

Mô hình

Chuẩn bị
- Cài đặt 2 node LDAP với IP như sau. Các bạn tham khảo link sau: Hướng dẫn cài đặt LDAP Trên CentOS 7
HOSTNAME ldap_94 (Master)
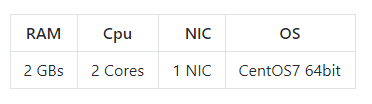
CPU 2 core
RAM 2 GB
Disk vda: os
Network eth0: 1 Network access (10.10.10.94)
HOSTNAME ldap_96 (Slave)
CPU 2 core
RAM 2 GB
Disk vda: os
Network eth0: 1 Network access (10.10.10.96)
- Lưu ý: Tắt Firewalld + SELinux
Cài đặt
Tại LDAP Master
Kích hoạt module syncprov
echo '
dn: cn=module,cn=config
objectClass: olcModuleList
cn: module
olcModulePath: /usr/lib64/openldap
olcModuleLoad: syncprov.la' > mod_syncprov.ldif

ldapadd -Y EXTERNAL -H ldapi:/// -f mod_syncprov.ldif
Kết quả
SASL/EXTERNAL authentication started
SASL username: gidNumber=0+uidNumber=0,cn=peercred,cn=external,cn=auth
SASL SSF: 0
adding new entry "cn=module,cn=config"
Cho phép module syncprov hoạt động trên DB LDAP
echo '
dn: olcOverlay=syncprov,olcDatabase={2}hdb,cn=config
objectClass: olcOverlayConfig
objectClass: olcSyncProvConfig
olcOverlay: syncprov
olcSpSessionLog: 100' > syncprov.ldif

ldapadd -Y EXTERNAL -H ldapi:/// -f syncprov.ldif
Kết quả
SASL/EXTERNAL authentication started
SASL username: gidNumber=0+uidNumber=0,cn=peercred,cn=external,cn=auth
SASL SSF: 0
adding new entry "olcOverlay=syncprov,olcDatabase={2}hdb,cn=config"
Tại LDAP Slave
Thiết lập module syncrepl
cat <<EOF > syncrepl.ldif
dn: olcDatabase={2}hdb,cn=config
changetype: modify
add: olcSyncRepl
olcSyncRepl: rid=001
  provider=ldap://10.10.10.94:389/
  bindmethod=simple
  binddn="cn=Manager,dc=nhanhoa,dc=local"
  credentials=Cloud365a@123
  searchbase="dc=nhanhoa,dc=local"
  scope=sub
  schemachecking=on
  type=refreshAndPersist
  retry="30 5 300 3"
  interval=00:00:05:00
EOF

ldapadd -Y EXTERNAL -H ldapi:/// -f syncrepl.ldif
Kết quả
SASL/EXTERNAL authentication started
SASL username: gidNumber=0+uidNumber=0,cn=peercred,cn=external,cn=auth
SASL SSF: 0
modifying entry "olcDatabase={2}hdb,cn=config"
Lưu ý
provider: Địa chỉ và port tới dịch vụ thư mục LDAP Masterbindmethod: Loại xác thựcbinddn: DN tài khoản xác thựccredentials: Mật khẩu tài khoản xác thựcsearchbase: Đồng bộ các Entry theo filtertype: Phương thức đồng bộ
Kiểm tra
Bổ sung Entry mới vào master
Bổ sung ou
echo '
dn: ou=Tests,dc=nhanhoa,dc=local
ou: Tests
objectclass: organizationalUnit' > test_structure.ldif

ldapadd -x -D cn=Manager,dc=nhanhoa,dc=local -W -f test_structure.ldif
Kết quả
adding new entry "ou=Tests,dc=nhanhoa,dc=local"
Bổ sung user
echo '
dn: cn=thanhbaba,ou=Tests,dc=nhanhoa,dc=local
objectClass: person
objectClass: inetOrgPerson
mail: [email protected]
userPassword:: b3BlbnN0YWNr
cn: thanhbaba
sn: thanhbaba' > user_test_thanhbaba.ldif

ldapadd -x -D cn=Manager,dc=nhanhoa,dc=local -W -f user_test_thanhbaba.ldif
Kết quả
adding new entry "cn=thanhbaba,ou=Tests,dc=nhanhoa,dc=local"
Kiểm tra lại Slave
ldapsearch -x -h 10.10.10.96 -b "dc=nhanhoa,dc=local" -s sub "(objectclass=person)"
Kết quả
# extended LDIF
#
# LDAPv3
# base <dc=nhanhoa,dc=local> with scope subtree
# filter: (objectclass=person)
# requesting: ALL
#

# thanhbaba, Tests, nhanhoa.local
dn: cn=thanhbaba,ou=Tests,dc=nhanhoa,dc=local
objectClass: person
objectClass: inetOrgPerson
mail: [email protected]
cn: thanhbaba
sn: thanhbaba

# search result
search: 2
result: 0 Success

# numResponses: 2
# numEntries: 1
Tắt master, kiếm tra lại tại Slave
Tại Node Master
[root@ldap_94 ~]# init 0
Tại Node Slave
ldapsearch -x -h 10.10.10.96 -b "dc=nhanhoa,dc=local" -s sub "(objectclass=person)"
Kết quả
# extended LDIF
#
# LDAPv3
# base <dc=nhanhoa,dc=local> with scope subtree
# filter: (objectclass=person)
# requesting: ALL
#

# thanhbaba, Tests, nhanhoa.local
dn: cn=thanhbaba,ou=Tests,dc=nhanhoa,dc=local
objectClass: person
objectClass: inetOrgPerson
mail: [email protected]
cn: thanhbaba
sn: thanhbaba

# search result
search: 2
result: 0 Success

# numResponses: 2
# numEntries: 1
Lưu ý: Với mô hình LDAP Master Slave chỉ có thể ghi duy nhất tại Master, nếu node Master dữ liệu chỉ có thể đọc và không thể ghi
Tổng kết
Như vậy ngoài mô hình LDAP master-master thì trong bài viết này mình đã triển khai mô hình LDAP master-slave. Ở bài viết tiếp theo mình sẽ hướng dẫn cách cấu hình LDAP với keepalive để tăng khả năng chịu lỗi của hệ thống.
Cảm ơn các bạn đã theo dõi serie tìm hiểu LDAP của mình.
Tài liệu tham khảo
https://www.server-world.info/en/note?os=CentOS_7&p=openldap&f=5
Thực hiện bởi cloud365.vn
Add Comment