


How to Install Pydio on Debian 11
Pydio is a free, open-source, and cloud-based file-sharing application. It is written in the Golang language and used for sharing files with the client. It allows you to share and access various documents such as files, images, and videos from anywhere using a mobile app, desktop software, or a web browser. It has native clients for Linux, Windows, and macOS, and mobile clients for Android and iOS.
In this tutorial, I will show you how to install Pydio app on Debian 11.
Prerequisites
- A server running Debian 11.
- A root password is configured on the server.
Install and Configure MariaDB
Pydio uses MariaDB as a database backend, so you must install the MariaDB database server on your server. You can install it by running the following command:
dnf install mariadb-server -y
Once the MariaDB is installed, secure the MariaDB installation using the following command:
mysql_secure_installation
This script will set a root password, remove anonymous users, disallow root login remotely and remove the test database as shown below:
Set root password? [Y/n] n

Remove anonymous users? [Y/n] y

Disallow root login remotely? [Y/n] y

Remove test database and access to it? [Y/n] y

Reload privilege tables now? [Y/n] y
Once MariaDB is secured, log in to the MariaDB shell:
mysql -u root -p
Once you are log in, create a database and user with the following command:
CREATE DATABASE pydiodb;
CREATE USER 'pydiodb'@'localhost' IDENTIFIED BY 'password';
Next, grant all the privileges to the Pydio with the following command:
GRANT ALL PRIVILEGES ON pydiodb.* to 'pydiouser'@'localhost';
Next, flush the privileges and exit from the MariaDB shell with the following command:
FLUSH PRIVILEGES;
EXIT;
Install Pydio Cells
By default, the Pydio package is not included in the Debian 11 repository. So you will need to download it from their official website.
You can download the latest version of Pydio cells using the following command:
distribId=cells wget -O /usr/bin/cells https://download.pydio.com/latest/${distribId}/release/{latest}/linux-amd64/${distribId}
Once the download is completed, set executable permission on the downlaoded file and bind it to the HTTP port using the following command:
chmod +x /usr/bin/cells
setcap 'cap_net_bind_service=+ep' /usr/bin/cells
Next, verify the Pydio cells version using the following command:
cells version
You will get the following output:
Warning: no private IP detected for binding broker. Will bind to 209.23.9.181, which may give public access to the broker.

Pydio Cells Home Edition

 Version: 	3.0.6

 Built: 	22 Mar 22 06:06 +0su - pydio

cells configure000

 Git commit: 	2165523347d2b9860d9c86236b7a518456d9cef3

 OS/Arch: 	linux/amd64

 Go version: 	go1.15.14
Configure Pydio Cells
Next, you will need to configure the Pydio Cells. You can configure it with the following command:
cells configure
You will be asked to choose between the browser-based and command-line installation modes.
Welcome to Pydio Cells Home Edition installation

Pydio Cells Home Edition (v3.0.3) will be configured to run on this machine.

Make sure to prepare access and credentials to a MySQL 5.6+ (or MariaDB equivalent) server.

Pick your installation mode when you are ready.
Select the browser-based installation and press the Enter key. Once the Pydio Cells is configured, you will get the following output:
Use the arrow keys to navigate: ↓ ↑ → ←

? Installation mode:

  ? Browser-based (requires a browser access)

    Command line (performed in this terminal)
? Browser-based (requires a browser access)
2022-04-02T11:16:18.544Z INFO pydio.gateway.rest Started
2022-04-02T11:16:18.685Z INFO pydio.rest.install Started
2022-04-02T11:16:22.010Z INFO
Installation Server is starting...
Listening to: 0.0.0.0:8080
2022-04-02T11:16:22.366Z INFO ? Created a new local CA at "/root/.config/pydio/cells/certs/rootCA.pem" ????
2022-04-02T11:16:22.366Z INFO ? Created a new certificate valid for the following names ???? - "127.0.0.1" - "209.23.9.181" - "localhost"
2022-04-02T11:16:22.366Z INFO ? The certificate is at "/root/.config/pydio/cells/certs/e6de382e6f121a9072d77b25ba622a36.pem"
2022-04-02T11:16:22.366Z INFO and the key at "/root/.config/pydio/cells/certs/e6de382e6f121a9072d77b25ba622a36-key.pem"
2022-04-02T11:16:22.366Z INFO
2022-04-02T11:16:22.366Z INFO ???? If you are behind a reverse proxy, you can either install the RootCA on the proxy machine trust store, or configure your proxy to `insecure_skip_verify` for pointing to Cells.
2022-04-02T11:16:22.367Z INFO ???? If you are developing locally, you may install the RootCA in your system trust store to see a green light in your browser!
2022-04-02T11:16:22.367Z INFO ???? To easily install the RootCA in your trust store, use https://github.com/FiloSottile/mkcert. Set the $CAROOT environment variable to the rootCA folder then use 'mkcert -install'
2022-04-02T11:16:22.367Z INFO
2022-04-02T11:16:22.367Z INFO Activating privacy features... done.
2022-04-02T11:16:22.367Z INFO https://0.0.0.0:8080
2022-04-02T11:16:22.367Z INFO WARNING: File descriptor limit 1024 is too low for production servers. At least 8192 is recommended. Fix with "ulimit -n 8192".
2022-04-02T11:16:24.365Z INFO pydio.gateway.proxy Restarting proxy {"caddyfile": "nn0.0.0.0:8080 {ntroot "/root/.config/pydio/cells/static/install"ntproxy /install [::]:38327nntnttls "/root/.config/pydio/cells/certs/e6de382e6f121a9072d77b25ba622a36.pem" "/root/.config/pydio/cells/certs/e6de382e6f121a9072d77b25ba622a36-key.pem"n}nnnnt "}
2022-04-02T11:16:24.868Z INFO pydio.gateway.proxy Restart done
Opening URL https://0.0.0.0:8080 in your browser. Please copy/paste it if the browser is not on the same machine.
Access Pydio Cells Web Installation Wizard
At this point, the Pydio Cells is started and listening on port 8080. You can access it using the URL https://your-server-ip:8080. You should see the Pydio Cells License agreement page:

Agree to the License agreement and click on the NEXT button. You should see the database configuration page.
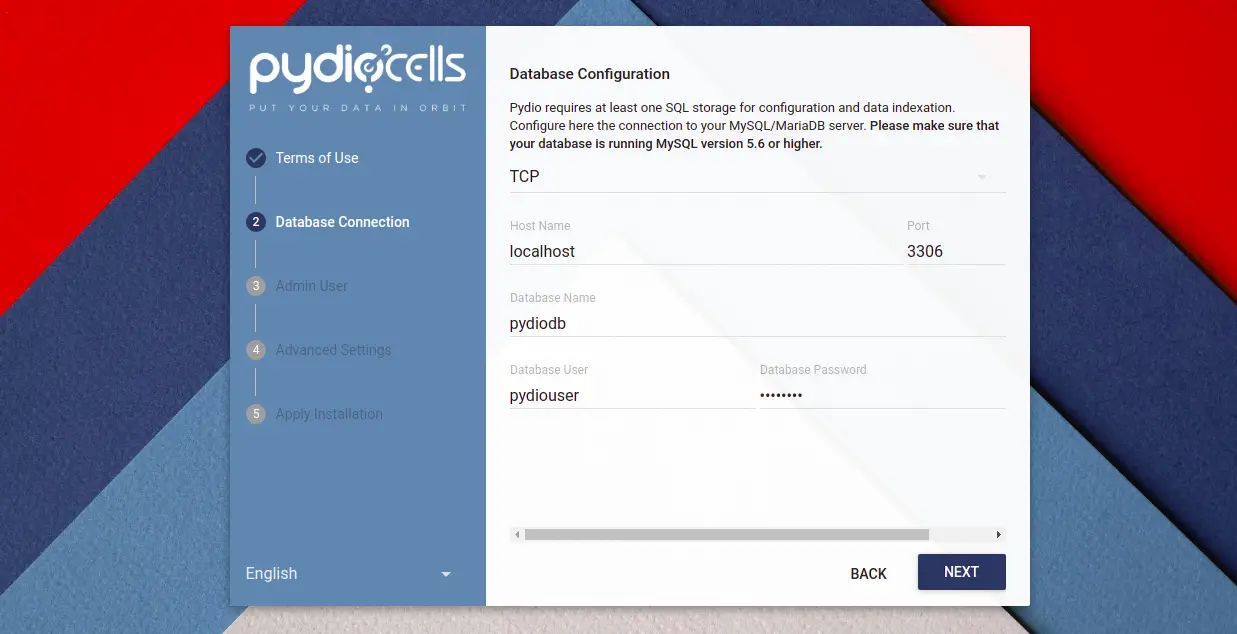
Provide your database configuration and click on the NEXT button. You should see the admin user creation page:
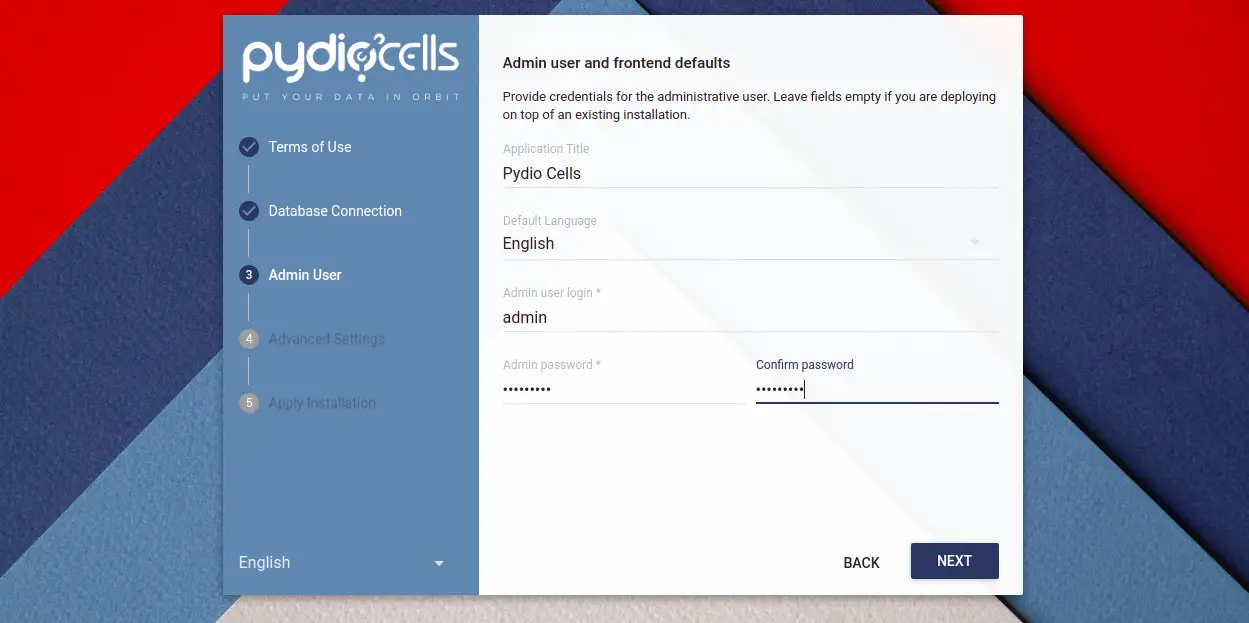
Provide your admin username, password, and click on the NEXT button. You should see the following page:
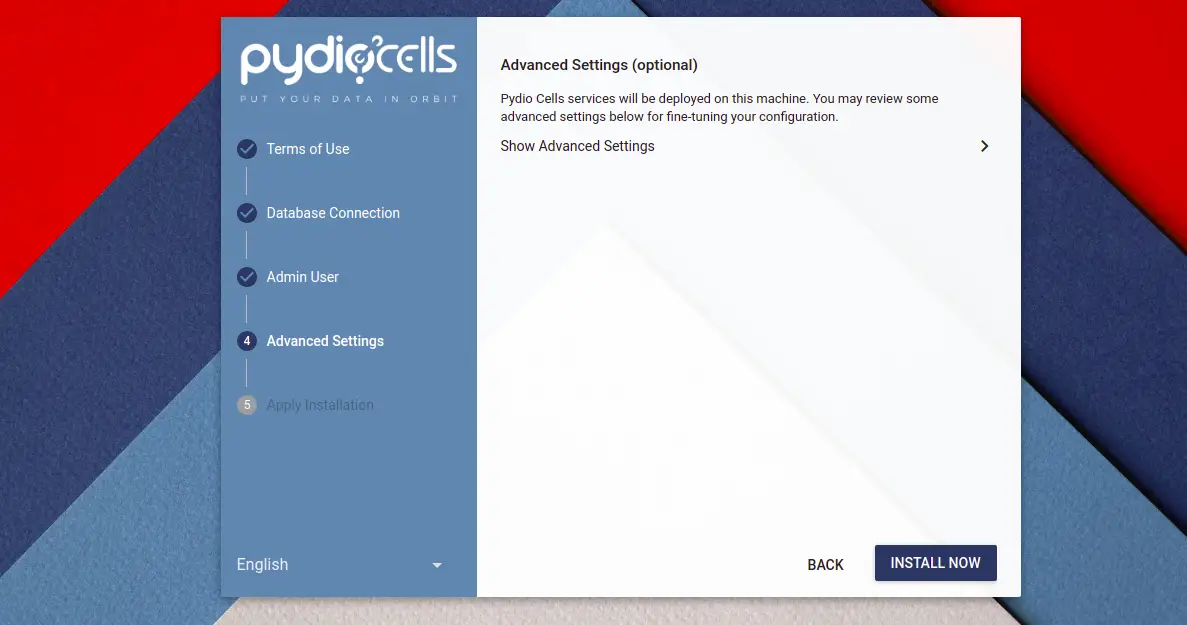
Now, click on the INSTALL NOW button. You should see the Pydio Cells login page:
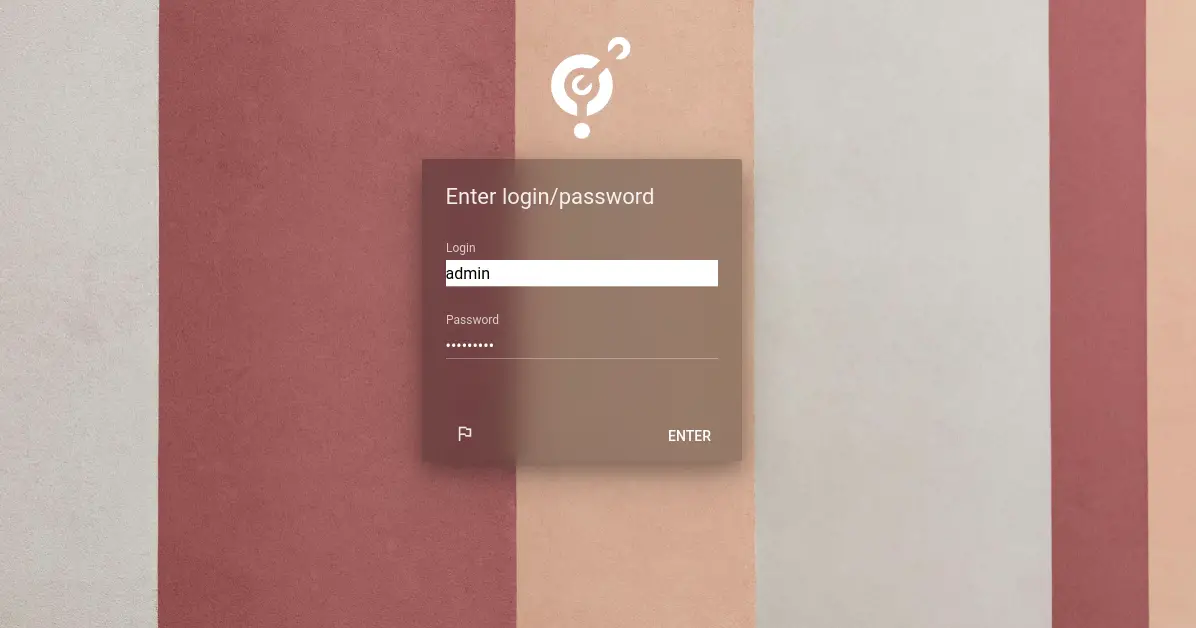
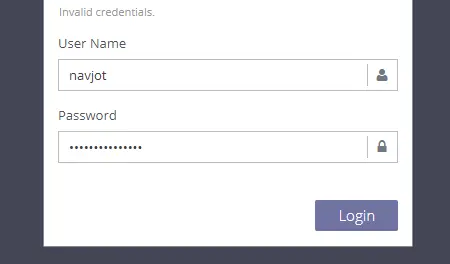
Provide your admin username, password, and click on the ENTER button. You should see the Pydio dashboard on the following page:

Create Systemd Service Fiel for Pydio Cells
Next, you will need to create a systemd service file to manage the Pydio service. First, press the CTRL+C to stop the Pydio service then create a systemd service file with the following command:
nano /etc/systemd/system/cells.service
Add the following lines:
[Unit]
Description=Pydio Cells

Documentation=https://pydio.com

Wants=network-online.target

After=network-online.target

AssertFileIsExecutable=/usr/bin/cells
Group=root
PermissionsStartOnly=true
AmbientCapabilities=CAP_NET_BIND_SERVICE
ExecStart=/usr/bin/cells start
Restart=on-failure
StandardOutput=journal
StandardError=inherit
LimitNOFILE=65536
TimeoutStopSec=5
KillSignal=INT
SendSIGKILL=yes
SuccessExitStatus=0
WorkingDirectory=/root [Install] WantedBy=multi-user.target
Save and close the file then reload the systemd daemon to apply the changes:
systemctl daemon-reload
Next, start and enable the Pydio service with the following command:
systemctl enable cells
systemctl start cells
You can also check the Pydio status with the following command:
systemctl status cells
You will get the following output:
? cells.service - Pydio Cells

     Loaded: loaded (/etc/systemd/system/cells.service; disabled; vendor preset: enabled)

     Active: active (running) since Sat 2022-04-02 11:34:24 UTC; 6s ago

       Docs: https://pydio.com

   Main PID: 25764 (cells)

      Tasks: 119 (limit: 2341)

     Memory: 421.6M

        CPU: 4.114s

     CGroup: /system.slice/cells.service

             ??25764 /usr/bin/cells start

             ??25769 /usr/bin/cells start --fork --config local --registry grpc://:8000 --broker grpc://:8003 ^pydio.grpc.jobs$

             ??25775 /usr/bin/cells start --fork --config local --registry grpc://:8000 --broker grpc://:8003 ^pydio.grpc.search$

             ??25781 /usr/bin/cells start --fork --config local --registry grpc://:8000 --broker grpc://:8003 ^pydio.gateway.websocket$

             ??25783 /usr/bin/cells start --fork --config local --registry grpc://:8000 --broker grpc://:8003 ^pydio.grpc.data.sync.pydiods1$

             ??25787 /usr/bin/cells start --fork --config local --registry grpc://:8000 --broker grpc://:8003 ^pydio.grpc.data.sync.personal$

             ??25790 /usr/bin/cells start --fork --config local --registry grpc://:8000 --broker grpc://:8003 ^pydio.grpc.data.sync.cellsdata$

             ??25802 /usr/bin/cells start --fork --config local --registry grpc://:8000 --broker grpc://:8003 ^pydio.grpc.data.sync.versions$

             ??25805 /usr/bin/cells start --fork --config local --registry grpc://:8000 --broker grpc://:8003 ^pydio.grpc.data.sync.thumbnail>

             ??25816 /usr/bin/cells start --fork --config local --registry grpc://:8000 --broker grpc://:8003 ^pydio.grpc.tasks$

             ??25819 /usr/bin/cells start --fork --config local --registry grpc://:8000 --broker grpc://:8003 ^pydio.grpc.data.objects.local1$

             ??25847 /usr/bin/cells start --fork --config local --registry grpc://:8000 --broker grpc://:8003 ^pydio.grpc.data.index.pydiods1$

             ??25848 /usr/bin/cells start --fork --config local --registry grpc://:8000 --broker grpc://:8003 ^pydio.grpc.data.index.personal$

             ??25849 /usr/bin/cells start --fork --config local --registry grpc://:8000 --broker grpc://:8003 ^pydio.grpc.data.index.cellsdat>

             ??25850 /usr/bin/cells start --fork --config local --registry grpc://:8000 --broker grpc://:8003 ^pydio.grpc.data.index.versions$

             ??25851 /usr/bin/cells start --fork --config local --registry grpc://:8000 --broker grpc://:8003 ^pydio.grpc.data.index.thumbnai>
Apr 02 11:34:29 debian11 cells[25764]: 2022-04-02T11:34:29.294Z INFO pydio.test.objects Started
Apr 02 11:34:29 debian11 cells[25764]: 2022-04-02T11:34:29.307Z INFO pydio.gateway.grpc Activating self-signed configura>
Apr 02 11:34:29 debian11 cells[25764]: 2022-04-02T11:34:29.308Z INFO pydio.gateway.grpc Started
Apr 02 11:34:30 debian11 cells[25764]: 2022-04-02T11:34:30.191Z INFO pydio.grpc.data.index.pydiods1 Warning: no private >
Apr 02 11:34:30 debian11 cells[25764]: 2022-04-02T11:34:30.194Z INFO pydio.grpc.data.index.personal Warning: no private >
Apr 02 11:34:30 debian11 cells[25764]: 2022-04-02T11:34:30.195Z INFO pydio.grpc.data.index.cellsdata Warning: no private>
Apr 02 11:34:30 debian11 cells[25764]: 2022-04-02T11:34:30.204Z INFO pydio.grpc.data.index.thumbnails Warning: no privat>
Apr 02 11:34:30 debian11 cells[25764]: 2022-04-02T11:34:30.212Z INFO pydio.grpc.data.index.versions Warning: no private >
Apr 02 11:34:30 debian11 cells[25764]: 2022-04-02T11:34:30.326Z INFO pydio.gateway.proxy Restarting proxy {"caddy>
Conclusion
Congratulations! you have successfully installed and configured Pydio Cells on Debian 11. You can now upload your files, documents, and images from the Pydio dashboard and access it from any mobile or web browser. Feel free to ask me if you have any questions.

Add Comment