


FTP or File Transfer Protocol is a very old well-known protocol for transferring files between a client and a server. It is also an insecure protocol ut only if used without TLS. In this tutorial, we will configure vsftpd for TLS which allows us to use FTP securely. FTP has been often replaced with more secure protocols such as SFTP or SCP these days.
If however, you need to use FTP with your server, vsftpd (Very Secure FTP Daemon) is a perfect choice.
In this tutorial, we will learn how to install and configure an FTP Server using vsftpd on an Ubuntu 20.04 based server. We will also learn how to secure the connection using SSL/TLS protocol.
Prerequisites
- An Ubuntu 20.04 server with a non-root user having sudo privileges.
Step 1 – Install vsftpd
The first step is to install vsftpd.
$ sudo apt update
$ sudo apt install vsftpd
Next, we need to backup the original configuration file so that we can start with a fresh configuration.
$ sudo cp /etc/vsftpd.conf /etc/vsftpd.conf.orig
Step 2 – Configure Firewall
In this step, we will configure the UFW firewall to allow access to the FTP ports.
First, let us check the status of the firewall.
$ sudo ufw status
Status: active

To                         Action      From
--                         ------      ----
OpenSSH                    ALLOW       Anywhere
OpenSSH (v6)               ALLOW       Anywhere (v6)
As we can, see only SSH ports are allowed so far. Let us open ports 20(FTP command port), 21(FTP data port), 990 for when we use TLS and ports 35000-40000 for the range of passive ports we may need in the future.
$ sudo ufw allow 20:21/tcp
$ sudo ufw allow 990/tcp
$ sudo ufw allow 35000:40000/tcp
$ sudo ufw status
Status: active

To                         Action      From
--                         ------      ----
OpenSSH                    ALLOW       Anywhere
990/tcp                    ALLOW       Anywhere
20:21/tcp                  ALLOW       Anywhere
35000:40000/tcp            ALLOW       Anywhere
OpenSSH (v6)               ALLOW       Anywhere (v6)
20:21/tcp (v6)             ALLOW       Anywhere (v6)
990/tcp (v6)               ALLOW       Anywhere (v6)
35000:40000/tcp (v6)       ALLOW       Anywhere (v6)
Step 3 – Configuring vsftpd
We will now go over some important settings in order for vsftpd to work.
Begin by opening the configuration file.
$ sudo nano /etc/vsftpd.conf
1. FTP Access
In this tutorial, we will allow FTP access only to the local users and disable any anonymous access. To do this, make sure the following lines exist and are as follows.
anonymous_enable=NO
local_enable=YES
2. Enabling File Uploads
The singular most important purpose of FTP here is to be able to write to the server. Uncomment the following line to enable file uploads by removing # in front of it.
write_enable=YES
3. Chroot Jail
FTP works best when a user is restricted to a certain directory. vsftpd achieves that by using chroot jails. When chroot is enabled for local users, they are restricted to their home directories by default. To achieve this, uncomment the following line.
chroot_local_user=YES
To prevent any security vulnerability, chroot when enabled won’t work as long as the directory users are restricted to is writable.
To get around this limitation, we have two methods to allow file uploads when chroot is enabled.
- Method 1 – This method works by using a different directory for FTP uploads. For this tutorial, we will create an
ftpdirectory inside the user’s home to serve as the chroot and a second writable directoryuploadfor uploading the files. To achieve this, add the following lines at the bottom of the file.user_sub_token=$USER local_root=/home/$USER/ftp - Method 2 – The second method is to simply grant writable access to the home directory as a whole. Add the following line to achieve this.
allow_writeable_chroot=YES
4. Passive FTP
vsftpd can use any port for passive FTP connections. We can specify a range for the minimum and maximum port number that vsftpd can use. These are the ports which we configured in our UFW firewall before.
Add the following lines to allow Passive FTP connections.
pasv_min_port=35000
pasv_max_port=40000
5. Restricting Users
To allow only certain users to log in to the FTP server, add the following lines at the bottom.
userlist_enable=YES
userlist_file=/etc/vsftpd.userlist
userlist_deny=NO
With this option enabled, we need to specify which users should be allowed to use FTP and add their usernames in the /etc/vsftpd.userlist file.
Restart vsftpd to enable the configuration.
$ sudo systemctl restart vsftpd
Step 4 – Configuring User Directory
For the purpose of this tutorial, we will create a new user account for FTP transactions. If you already have a user account for this purpose, you can skip step 1. Also, if you had set allow_writeable_chroot=YES in the configuration file before, you can skip step 3.
Step 1 – Add a new user.
$ sudo adduser testuser
Set a strong password and skip through all the other prompts.
Step 2 – Add the user to the allowed FTP users list.
$ echo "testuser" | sudo tee -a /etc/vsftpd.userlist
Step 3 – Create FTP and Files Directory
This step is if you want a different directory as FTP root and a different one for uploading files to get around the chroot jail limitation.
Create the FTP folder.
$ sudo mkdir /home/testuser/ftp
Set its ownership.
$ sudo chown nobody:nogroup /home/testuser/ftp
Remove the write permissions.
$ sudo chmod a-w /home/testuser/ftp
Verify the permissions before proceeding.
$ sudo ls -al /home/testuser/ftp
total 8
dr-xr-xr-x 2 nobody   nogroup  4096 Jun  7 13:08 .
drwxr-xr-x 3 testuser testuser 4096 Jun  7 13:08 ..
Now let us create the actual writable directory for the files.
$ sudo mkdir /home/testuser/ftp/upload
$ sudo chown testuser:testuser /home/testuser/ftp/upload
Test the permissions.
$ sudo ls -al /home/testuser/ftp
total 12
dr-xr-xr-x 3 nobody   nogroup  4096 Jun  7 13:10 .
drwxr-xr-x 3 testuser testuser 4096 Jun  7 13:08 ..
drwxr-xr-x 2 testuser testuser 4096 Jun  7 13:10 upload
Finally, let’s add a test.txt file to use for testing.
$ echo "vsftpd test file" | sudo tee /home/testuser/ftp/upload/test.txt
Step 5 – Test FTP Access
Our FTP server is fully functional at this point of time. We can do a little test before proceeding ahead.
Let us try to login as an anonymous user.
$ ftp -p 136.244.105.99
Connected to 136.244.105.99.
220 (vsFTPd 3.0.3)
Name (136.244.105.99:default): anonymous
530 Permission denied.
ftp: Login failed.
ftp>
Close the connection.
ftp> bye
It works as intended i.e. anonymous users are not allowed.
Let us try to connect as any other sudo user. It shouldn’t connect as well.
$ ftp -p 136.244.105.99
Connected to 136.244.105.99.
220 (vsFTPd 3.0.3)
Name (136.244.105.99:default): sudo_user
530 Permission denied.
ftp: Login failed.
ftp>
Close the connection.
ftp> bye
Let us finally try connecting as the testuser which we created for FTP.
$ ftp -p 136.244.105.99
Connected to 136.244.105.99.
220 (vsFTPd 3.0.3)
Name (136.244.105.99:default): testuser
331 Please specify the password.
Password: your_user's_password
230 Login successful.
Remote system type is UNIX.
Using binary mode to transfer files.
ftp>
Let us switch to upload directory and use the get command to transfer the test file to our local machine.
ftp> cd upload
250 Directory successfully changed.
ftp> get test.txt
227 Entering Passive Mode (136,244,105,99,165,42).
150 Opening BINARY mode data connection for test.txt (17 bytes).
226 Transfer complete.
16 bytes received in 0.0101 seconds (164.3719 kB/s)
ftp>
Next, let us upload the file with a new name using the put command to test the write permissions.
ftp> put test.txt upload.txt
227 Entering Passive Mode (136,244,105,99,163,102).
150 Ok to send data.
226 Transfer complete.
17 bytes sent in 0.000894 seconds (518.7988 kB/s)
Close the connection.
ftp> bye
Step 6 – Securing Transmissions using SSL/TLS
In order to encrypt the FTP transmissions, we need to have an SSL Certificate and configure vsftpd to use it.
If you already have a domain or subdomain pointing to your FTP server, you can create a free Let’s Encrypt SSL Certificate and use that.
For the purpose of our tutorial, we will use a self-signed SSL certificate. To create one, use the openssl command.
The following command will create a 2048-bit private key and a certificate valid for 1 year. Both the certificate and the key will be saved to the same file.
$ sudo openssl req -x509 -nodes -days 365 -newkey rsa:2048 -keyout /etc/ssl/private/vsftpd.pem -out /etc/ssl/private/vsftpd.pem
You can either skip the prompts that follow or fill the values to your liking.
Now that our certificate is created, it is time to open the vsftpd configuration file again.
$ sudo nano /etc/vsftpd.conf
Find the following lines and comment them out by putting a hash in front of them as follows.
# rsa_cert_file=/etc/ssl/certs/ssl-cert-snakeoil.pem
# rsa_private_key_file=/etc/ssl/private/ssl-cert-snakeoil.key
Now, add the following lines.
rsa_cert_file=/etc/ssl/private/vsftpd.pem
rsa_private_key_file=/etc/ssl/private/vsftpd.pem
Also, change the value of ssl_enable to YES.
ssl_enable=YES
Let us add a few more settings to improve SSL security.
allow_anon_ssl=NO
force_local_data_ssl=YES
force_local_logins_ssl=YES
ssl_tlsv1=YES
ssl_sslv2=NO
ssl_sslv3=NO
require_ssl_reuse=NO
ssl_ciphers=HIGH
Most of these settings are self-explanatory. These disable SSL for Anonymous users and to require SSL for both data transfer and logins. We also disabled insecure SSL protocols and will be sticking to TLSv1.0. And finally, we have disabled the reuse of SSL and require High Encryption cipher suites.
Restart the server for the settings to take effect.
$ sudo systemctl restart vsftpd
Now, you won’t be able to use FTP via command line. You will need to connect using a client that supports TLS.
Step 7 – Testing TLS with FileZilla
For our tutorial, we will test the TLS capability using Filezilla.
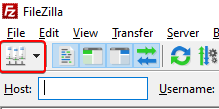
When you open Filezilla, click on the Site Manager icon just above the word Host on the top row.
A new window will open. Click the New Site button in the bottom right corner.
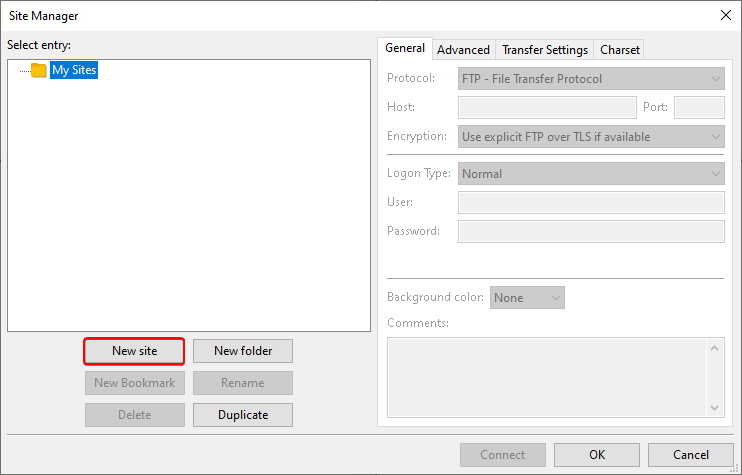
You will see a new icon with the name New site. You can rename it using the Rename button.
Fill out the Host field with your server’s IP address. Since our FTP port is 21 which is the default port for FTP so you can leave the port field empty. For the Encryption option, select Require explicit FTP over TLS from the drop-down menu.
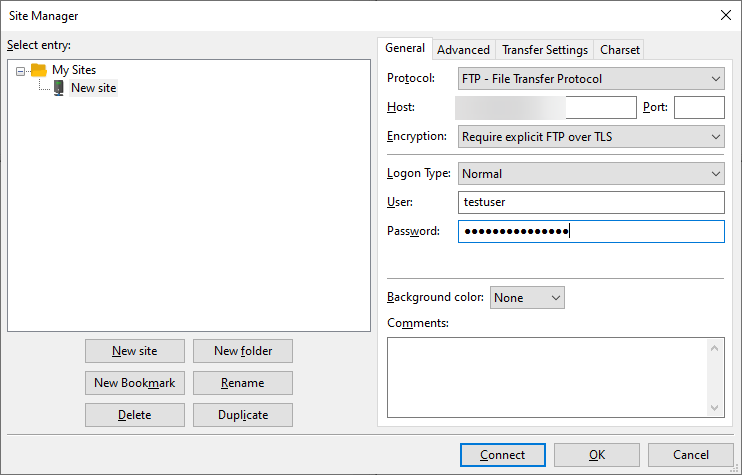
Fill in your FTP username and password with the ones we created above. Click the Connect button to proceed.
Upon successful connection, you will see a server certificate that looks like the following.
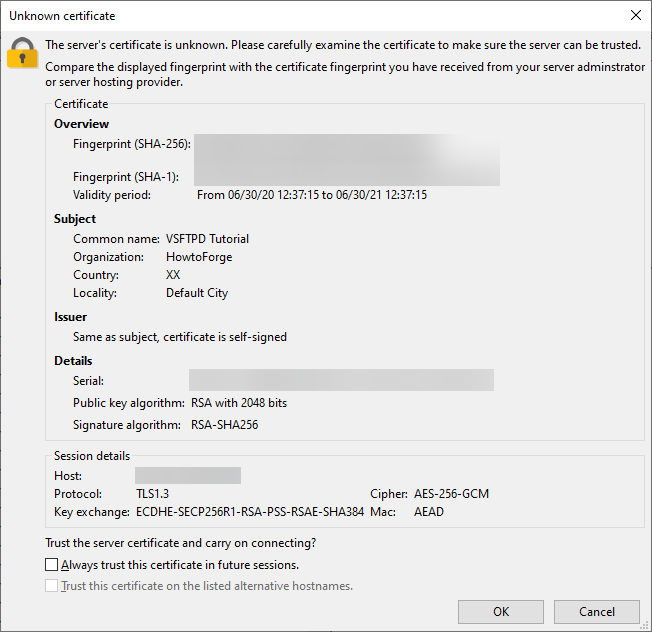
You can check the option Always trust this certificate in future sessions. so that you don’t get asked every time on logging in. Click Ok to proceed.
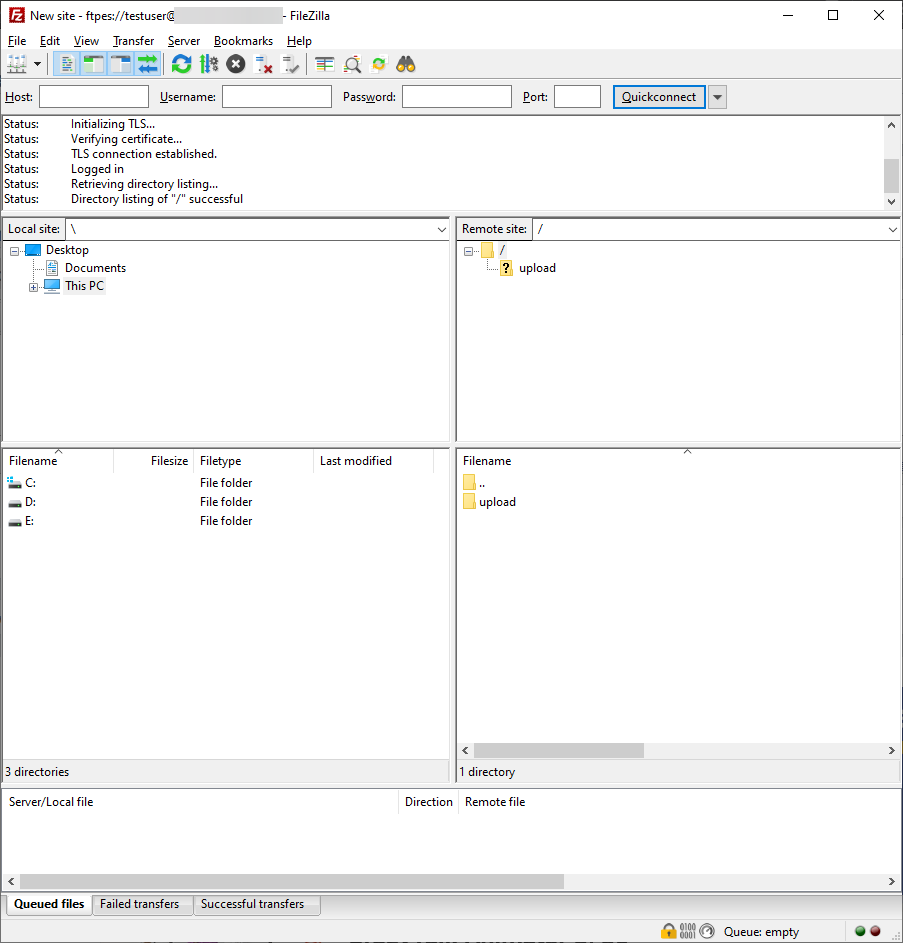
You can now perform normal FTP operations.
Step 8 – Disable Shell Access
This step is entirely optional. By default, when creating an FTP user, if not explicitly specified the user will have SSH access to the server.
You should disable shell access to the FTP user to improve security. To disable it, we need to create a new shell which will print a message saying that the user account is limited to FTP access only.
Create the /bin/ftponly shell and make it executable.
$ echo -e '#!/bin/sh\necho "This account is limited to FTP access only."' | sudo tee -a  /bin/ftponly
$ sudo chmod a+x /bin/ftponly
Append the new shell to the list of valid shells in the /etc/shells file.
$ echo "/bin/ftponly" | sudo tee -a /etc/shells
Change the user shell to /bin/ftponly.
$ sudo usermod newftpuser -s /bin/ftponly
You can use the same command to change the shell of all users you want to give the FTP access to.
Conclusion
This concludes our tutorial where we installed and configured vsftpd to install an FTP server on an Ubuntu 20.04 based server. We also configured our FTP connection to work using SSL/TLS.
If you have any questions, ask them in the comments below.
Add Comment