


1. Giới thiệu
Bảo mật là yếu tố cốt lõi khi triển khai API Gateway trong bất kỳ hệ thống phân tán nào. Apache APISIX cung cấp nhiều cơ chế bảo mật mạnh mẽ như xác thực JWT, API Key, mTLS và xác thực OAuth2. Trong bài viết này, chúng ta sẽ tìm hiểu cách cấu hình bảo mật cho API Gateway với Apache APISIX, giúp bảo vệ các dịch vụ backend trước các mối đe dọa.
2. Các phương pháp bảo mật phổ biến trong APISIX
- API Key: Xác thực đơn giản bằng cách gửi khóa bí mật cùng request.
- JWT (JSON Web Token): Xác thực dựa trên token với payload chứa thông tin người dùng.
- mTLS (Mutual TLS): Xác thực hai chiều giữa client và server.
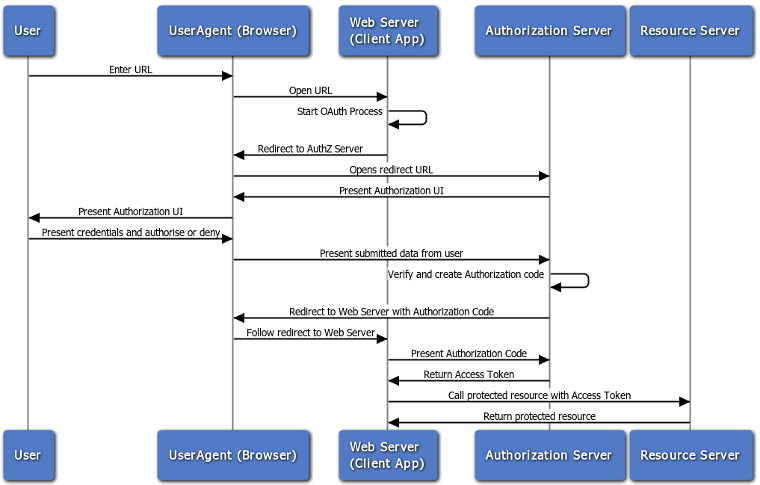
- OAuth2: Xác thực người dùng thông qua các nhà cung cấp như Google, GitHub.
3. Cấu hình API Key Authentication
3.1. Tạo Consumer
Consumer là đại diện cho người dùng API. Để sử dụng API Key, trước tiên cần tạo một consumer.
curl -i -X PUT http://127.0.0.1:9080/apisix/admin/consumers/user1 \
  -H "X-API-Key: edd1c9f034335f136f87ad84b625c8f1" \
  -d '{
    "username": "user1",
    "plugins": {
      "key-auth": {
        "key": "my-api-key"
      }
    }
  }'
3.2. Tạo Route với API Key
curl -i -X PUT http://127.0.0.1:9080/apisix/admin/routes/10 \
  -H "X-API-Key: edd1c9f034335f136f87ad84b625c8f1" \
  -d '{
    "uri": "/secure",
    "plugins": {
      "key-auth": {}
    },
    "upstream": {
      "type": "roundrobin",
      "nodes": {
        "httpbin.org:80": 1
      }
    }
  }'
3.3. Kiểm tra API Key
curl -i -X GET http://127.0.0.1:9080/secure \
  -H "apikey: my-api-key"
Nếu thành công, bạn sẽ thấy HTTP 200 OK. Nếu thiếu API Key, APISIX sẽ trả về 401 Unauthorized.
4. Cấu hình JWT Authentication
4.1. Tạo Secret Key
Tạo secret key cho JWT:
openssl genrsa -out jwt_private_key.pem 2048
openssl rsa -in jwt_private_key.pem -pubout -out jwt_public_key.pem
4.2. Cấu hình JWT cho Consumer
curl -i -X PUT http://127.0.0.1:9080/apisix/admin/consumers/user2 \
  -H "X-API-Key: edd1c9f034335f136f87ad84b625c8f1" \
  -d '{
    "username": "user2",
    "plugins": {
      "jwt-auth": {
        "key": "user2",
        "secret": "my-jwt-secret"
      }
    }
  }'
4.3. Tạo Token
JWT_TOKEN=$(echo -n '{"iss":"user2","exp":'$(($(date +%s) + 3600))'}' | \
  openssl dgst -sha256 -sign jwt_private_key.pem | base64 | tr -d '\n')
4.4. Tạo Route với JWT Authentication
curl -i -X PUT http://127.0.0.1:9080/apisix/admin/routes/11 \
  -H "X-API-Key: edd1c9f034335f136f87ad84b625c8f1" \
  -d '{
    "uri": "/secure-jwt",
    "plugins": {
      "jwt-auth": {}
    },
    "upstream": {
      "type": "roundrobin",
      "nodes": {
        "httpbin.org:80": 1
      }
    }
  }'
4.5. Kiểm tra JWT
curl -i -X GET http://127.0.0.1:9080/secure-jwt \
  -H "Authorization: Bearer $JWT_TOKEN"
Nếu thành công, bạn sẽ thấy HTTP 200 OK.
5. Cấu hình mTLS Authentication
5.1. Tạo chứng chỉ SSL
openssl req -newkey rsa:2048 -nodes -keyout client.key -x509 -days 365 -out client.crt -subj "/CN=client"
openssl req -newkey rsa:2048 -nodes -keyout server.key -x509 -days 365 -out server.crt -subj "/CN=server"
5.2. Cấu hình APISIX cho mTLS
apisix:
  ssl:
    enable: true
    ssl_cert: "/usr/local/apisix/certs/server.crt"
    ssl_cert_key: "/usr/local/apisix/certs/server.key"
5.3. Tạo Route yêu cầu mTLS
curl -i -X PUT http://127.0.0.1:9080/apisix/admin/routes/12 \
  -H "X-API-Key: edd1c9f034335f136f87ad84b625c8f1" \
  -d '{
    "uri": "/secure-mtls",
    "plugins": {
      "mtls-auth": {}
    },
    "upstream": {
      "type": "roundrobin",
      "nodes": {
        "httpbin.org:80": 1
      }
    }
  }'
5.4. Kiểm tra mTLS
curl -v --key client.key --cert client.crt https://127.0.0.1:9443/secure-mtls
6. Kết luận
Với cấu hình API Key, JWT và mTLS, bạn đã có thể bảo vệ các API của mình khỏi các truy cập trái phép. Bài viết tiếp theo sẽ tập trung vào cấu hình OAuth2 để tăng cường bảo mật API.
7. Từ khóa SEO
- bảo mật API Gateway
- cấu hình API Key APISIX
- cấu hình JWT APISIX
- bảo mật API với Apache APISIX
- cấu hình mTLS APISIX
APISIX Series: 3. Cấu hình API Gateway với Apache APISIX
Add Comment