


1. Giới thiệu
Apache APISIX là một API Gateway mã nguồn mở mạnh mẽ, cho phép bạn dễ dàng quản lý, bảo mật và giám sát lưu lượng API. Để tận dụng hết sức mạnh của APISIX, bước đầu tiên là triển khai nó trên môi trường phù hợp. Trong bài viết này, chúng ta sẽ tìm hiểu cách cài đặt Apache APISIX trên Docker, Kubernetes và dưới dạng cluster 3 node trên Ubuntu mà không dùng Docker.
2. Lợi ích khi triển khai APISIX trên Docker và Kubernetes
- Tự động mở rộng: Dễ dàng mở rộng dịch vụ theo nhu cầu lưu lượng.
- Khả năng phục hồi cao: Tự động phục hồi khi có lỗi xảy ra.
- Quản lý tài nguyên hiệu quả: Tận dụng tài nguyên phần cứng tốt hơn so với các phương pháp triển khai truyền thống.
- Dễ dàng tích hợp: Kết hợp với các công cụ DevOps như Jenkins, GitLab CI/CD.
3. Cài đặt Apache APISIX trên Docker
3.1. Yêu cầu hệ thống
- Docker (phiên bản 20.10 trở lên)
- Docker Compose (phiên bản 1.29 trở lên)
3.2. Clone source
git clone https://github.com/apache/apisix-docker.git
cd apisix-docker/example
3.3. Tạo tệp Docker Compose
Tệp docker-compose.yml với nội dung như sau:
version: "3"

services:
  apisix-dashboard:
    image: apache/apisix-dashboard:3.0.1-alpine
    restart: always
    volumes:
    - ./dashboard_conf/conf.yaml:/usr/local/apisix-dashboard/conf/conf.yaml
    ports:
    - "9000:9000"
    networks:
      apisix:

  apisix:
    image: apache/apisix:${APISIX_IMAGE_TAG:-3.6.0-debian}
    restart: always
    volumes:
      - ./apisix_conf/config.yaml:/usr/local/apisix/conf/config.yaml:ro
    depends_on:
      - etcd
    ##network_mode: host
    ports:
      - "9180:9180/tcp"
      - "9080:9080/tcp"
      - "9091:9091/tcp"
      - "9443:9443/tcp"
      - "9092:9092/tcp"
    networks:
      apisix:

  etcd:
    image: bitnami/etcd:3.4.15
    restart: always
    volumes:
      - etcd_data:/bitnami/etcd
    environment:
      ETCD_ENABLE_V2: "true"
      ALLOW_NONE_AUTHENTICATION: "yes"
      ETCD_ADVERTISE_CLIENT_URLS: "http://etcd:2379"
      ETCD_LISTEN_CLIENT_URLS: "http://0.0.0.0:2379"
    ports:
      - "2379:2379/tcp"
    networks:
      apisix:

  web1:
    image: nginx:1.19.0-alpine
    restart: always
    volumes:
      - ./upstream/web1.conf:/etc/nginx/nginx.conf
    ports:
      - "9081:80/tcp"
    environment:
      - NGINX_PORT=80
    networks:
      apisix:

  web2:
    image: nginx:1.19.0-alpine
    restart: always
    volumes:
      - ./upstream/web2.conf:/etc/nginx/nginx.conf
    ports:
      - "9082:80/tcp"
    environment:
      - NGINX_PORT=80
    networks:
      apisix:

  prometheus:
    image: prom/prometheus:v2.25.0
    restart: always
    volumes:
      - ./prometheus_conf/prometheus.yml:/etc/prometheus/prometheus.yml
    ports:
      - "9090:9090"
    networks:
      apisix:

  grafana:
    image: grafana/grafana:7.3.7
    restart: always
    ports:
      - "3000:3000"
    volumes:
      - "./grafana_conf/provisioning:/etc/grafana/provisioning"
      - "./grafana_conf/dashboards:/var/lib/grafana/dashboards"
      - "./grafana_conf/config/graf9-grafana.ini:/etc/grafana/graf9-grafana.ini"
    networks:
      apisix:

networks:
  apisix:
    driver: bridge

volumes:
  etcd_data:
    driver: local
3.4. Khởi chạy Docker Compose
Chạy lệnh sau để khởi động APISIX và etcd:
docker-compose up -d
Kiểm tra trạng thái container:
docker ps
Nếu mọi thứ hoạt động đúng, bạn sẽ thấy APISIX chạy trên cổng 9080 (HTTP) và 9443 (HTTPS).
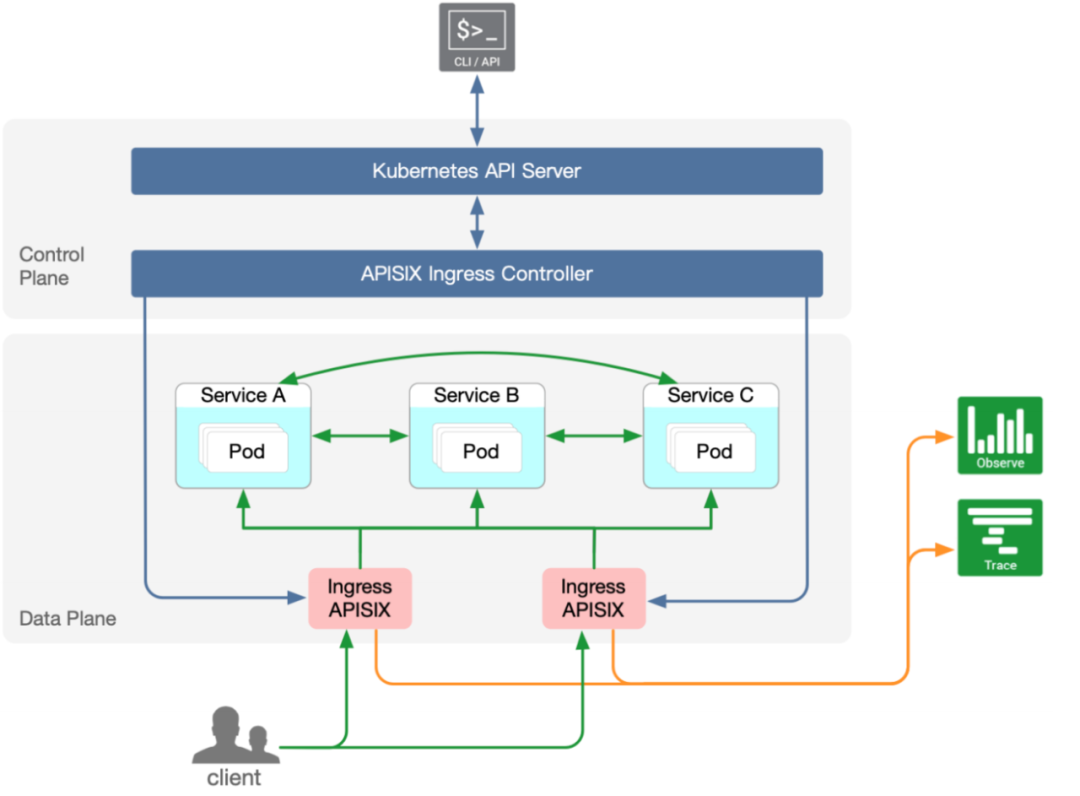
4. Cài đặt Apache APISIX trên Kubernetes
4.1. Cài đặt Helm
Đảm bảo Helm đã được cài đặt trên cluster Kubernetes của bạn:
curl https://raw.githubusercontent.com/helm/helm/main/scripts/get-helm-3 | bash
4.2. Cài đặt APISIX
helm repo add apisix https://charts.apiseven.com
helm repo update
helm install apisix apisix/apisix
Kiểm tra trạng thái cài đặt:
kubectl get pods -n default
5. Cài đặt APISIX dưới dạng Cluster 3 Node trên Ubuntu (Systemd)
5.1. Yêu cầu hệ thống
- 3 máy chủ Ubuntu 22.04 LTS (hoặc phiên bản mới hơn)
- Mỗi máy có ít nhất 2 CPU và 4GB RAM
- Địa chỉ IP tĩnh
5.2. Cài đặt các gói cần thiết
Cài đặt các gói cơ bản trên mỗi node:
sudo apt update && sudo apt upgrade -y
sudo apt install git curl wget build-essential libpcre3 libpcre3-dev zlib1g-dev libssl-dev unzip -y
5.3. Cài đặt OpenResty
wget https://openresty.org/download/openresty-1.21.4.1.tar.gz
tar -xzvf openresty-1.21.4.1.tar.gz
cd openresty-1.21.4.1/
./configure --prefix=/usr/local/openresty --with-pcre --with-pcre-jit --with-http_ssl_module
make && sudo make install
export PATH=/usr/local/openresty/nginx/sbin:$PATH
5.4. Cài đặt LuaRocks và APISIX
wget https://luarocks.org/releases/luarocks-3.9.1.tar.gz
tar -xzvf luarocks-3.9.1.tar.gz
cd luarocks-3.9.1/
./configure --prefix=/usr/local/openresty/luajit --with-lua=/usr/local/openresty/luajit --lua-suffix=jit
make && sudo make install
export PATH=/usr/local/openresty/luajit/bin:$PATH

# Cài đặt APISIX
git clone https://github.com/apache/apisix.git
cd apisix
make deps
sudo make install
5.5. Cấu hình Etcd Cluster
Cài đặt Etcd trên mỗi node:
sudo apt install etcd -y
Cấu hình Etcd trên mỗi node, sửa tệp /etc/default/etcd:
ETCD_NAME="node1"
ETCD_INITIAL_CLUSTER="node1=http://:2380,node2=http://:2380,node3=http://:2380"
ETCD_INITIAL_ADVERTISE_PEER_URLS="http://:2380"
ETCD_ADVERTISE_CLIENT_URLS="http://:2379"
ETCD_LISTEN_PEER_URLS="http://0.0.0.0:2380"
ETCD_LISTEN_CLIENT_URLS="http://0.0.0.0:2379"
sudo systemctl restart etcd
Lặp lại trên Node 2 và Node 3 với cấu hình tương ứng.
5.6. Tạo service systemd cho APISIX
sudo nano /etc/systemd/system/apisix.service
Nội dung:
[Unit]
Description=Apache APISIX Service
After=network.target

[Service]
ExecStart=/usr/local/bin/apisix start
ExecStop=/usr/local/bin/apisix stop
Restart=always
Environment=APISIX_HOME=/usr/local/apisix

[Install]
WantedBy=multi-user.target
Kích hoạt và khởi động APISIX:
sudo systemctl daemon-reload
sudo systemctl enable apisix
sudo systemctl start apisix
5.7. Xác minh trạng thái Cluster
Trên Node 1, chạy lệnh sau để kiểm tra:
etcdctl member list
apisix status
6. Kết luận
Triển khai Apache APISIX trên Docker, Kubernetes và dưới dạng Cluster 3 Node trên Ubuntu giúp bạn tận dụng tối đa sức mạnh của API Gateway này, đảm bảo hệ thống của bạn linh hoạt, dễ mở rộng và bảo mật. Đây là bước khởi đầu quan trọng trước khi tiến tới cấu hình và tối ưu hóa APISIX trong các môi trường sản xuất.
7. Từ khóa SEO
- cài đặt Apache APISIX Docker
- triển khai APISIX Kubernetes
- API Gateway mã nguồn mở
- hướng dẫn cài đặt APISIX
- triển khai cluster APISIX
APISIX Series: 1.Apache APISIX là gì? Giới thiệu và Tại sao nên sử dụng
Add Comment