


Amazon Elastic Block Store (EBS) is a block storage system used to store persistent data. Amazon EBS is suitable for EC2 instances by providing highly available block level storage volumes. It has three types of volume, i.e. General Purpose (SSD), Provisioned IOPS (SSD), and Magnetic. These three volume types differ in performance, characteristics, and cost.
EBS Volume Types
Following are the three types.
EBS General Purpose (SSD)
This volume type is suitable for small and medium workloads like Root disk EC2 volumes, small and medium database workloads, frequently logs accessing workloads, etc. By default, SSD supports 3 IOPS (Input Output Operations per Second)/GB means 1 GB volume will give 3 IOPS, and 10 GB volume will give 30 IOPS. Its storage capacity of one volume ranges from 1 GB to 1 TB. The cost of one volume is $0.10 per GB for one month.
Provisioned IOPS (SSD)
This volume type is suitable for the most demanding I/O intensive, transactional workloads and large relational, EMR and Hadoop workloads, etc. By default, IOPS SSD supports 30 IOPS/GB means 10GB volume will give 300 IOPS. Its storage capacity of one volume ranges from 10GB to 1TB. The cost of one volume is $0.125 per GB for one month for provisioned storage and $0.10 per provisioned IOPS for one month.
EBS Magnetic Volumes
It was formerly known as standard volumes. This volume type is suitable for ideal workloads like infrequently accessing data, i.e. data backups for recovery, logs storage, etc. Its storage capacity of one volume ranges from 10GB to 1TB. The cost of one volume is $0.05 per GB for one month for provisioned storage and $0. 05 per million I/O requests.
Volumes Attached to One Instance
Each account will be limited to 20 EBS volumes. For a requirement of more than 20 EBS volumes, contact Amazon’s Support team. We can attach up to 20 volumes on a single instance and each volume ranges from 1GB to 1TB in size.
In EC2 instances, we store data in local storage which is available till the instance is running. However, when we shut down the instance, the data gets lost. Thus, when we need to save anything, it is advised to save it on Amazon EBS, as we can access and read the EBS volumes anytime, once we attach the file to an EC2 instance.
Amazon EBS Benefits
- Reliable and secure storage − Each of the EBS volume will automatically respond to its Availability Zone to protect from component failure.
- Secure − Amazon’s flexible access control policies allows to specify who can access which EBS volumes. Access control plus encryption offers a strong defense-in-depth security strategy for data.
- Higher performance − Amazon EBS uses SSD technology to deliver data results with consistent I/O performance of application.
- Easy data backup − Data backup can be saved by taking point-in-time snapshots of Amazon EBS volumes.
How to Set Up Amazon EBS?
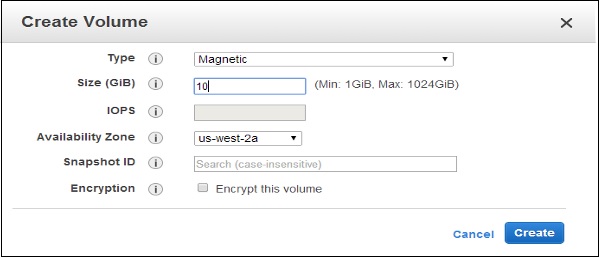
Step 1 − Create Amazon EBS volume using the following steps.
- Open the Amazon EC2 console.
- Select the region in the navigation bar where the volume is to be created.
- In the navigation pane, select Volumes, then select Create Volume.
- Provide the required information like Volume Type list, Size, IOPS, Availability zone, etc. then click the Create button.
The volume names can be seen in the volumes list.

Step 2 − Store EBS Volume from a snapshot using the following steps.
- Repeat the above 1 to 4 steps to create volume.
- Type snapshot ID in the Snapshot ID field from which the volume is to be restored and select it from the list of suggested options.
- If there is requirement for more storage, change the storage size in the Size field.
- Select the Yes Create button.
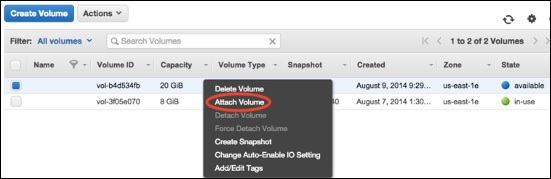
Step 3 − Attach EBS Volume to an Instance using the following steps.
- Open the Amazon EC2 console.
- Select Volumes in the navigation pane. Choose a volume and click the Attach Volume option.
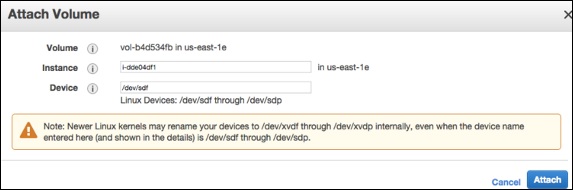
- An Attach Volume dialog box will open. Enter the name/ID of instance to attach the volume in the Instance field or select it from the list of suggestion options.
- Click the Attach button.
- Connect to instance and make the volume available.
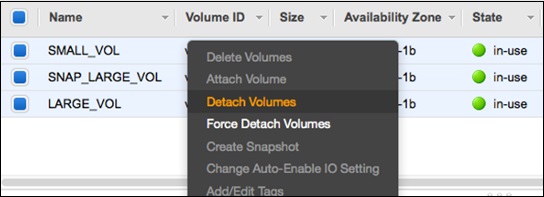
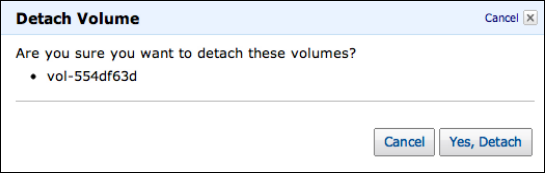
Step 4 − Detach a volume from Instance.
- First, use the command /dev/sdh in cmd to unmount the device.
- Open the Amazon EC2 console.
- In the navigation pane, select the Volumes option.
- Choose a volume and click the Detach Volumes option.
- A confirmation dialog box opens. Click the Yes, Detach button to confirm.


Add Comment