Introduction
Vagrant is an open-source tool that allows you to create, configure, and manage boxes of virtual machines through an easy to use command interface. Essentially, it is a layer of software installed between a virtualization tool (such as VirtualBox, Docker, Hyper-V) and a VM.
It is often used in software development to ensure all team members are building for the same configuration. Not only does it share environments, but it also shares code as well. This allows the code from one developer to work on the system of another, making collaborative and cooperative development possible.
This tutorial walks you through everything you need to know about configuring and managing Vagrant.

Getting Started With Vagrant
Before you start, make sure you already have a virtualization solution on your system. Solutions that work with Vagrant include VirtualBox, VMware, Docker, Hyper-V, and custom solutions.
Installation
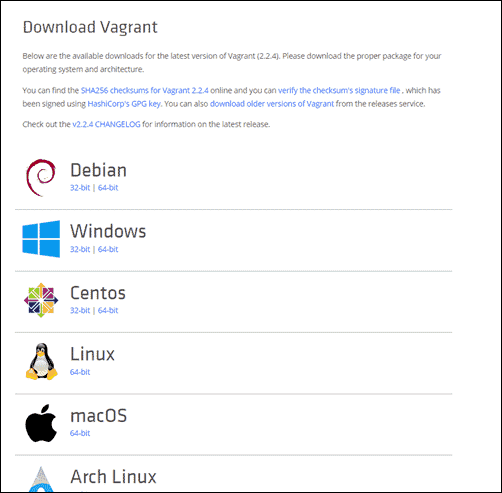
1. To find the latest version of Vagrant, use a web browser to navigate to its official webpage:
https://www.vagrantup.com/downloads.html
2. You will see a list of all the different supported operating systems, with a 32-bit and 64-bit package for each. Download the appropriate file for your operating system, then run the installer.

Note: For detailed instructions on installing Vagrant via terminal on Ubuntu and CentOS based Linux distributions, refer to our how-to guides:
3. There are two ways to check if the installation was successful:
- You can either use:
vagrant -vwhich should show the version number running on your computer. The latest version to date is Vagrant 2.2.6.
- Or you can type in the following command in the terminal:
vagrantThis output would show you a list of frequently used commands if the tool were installed correctly.
Note: If you do not have a virtualization solution, our guides for installing Docker on CentOS or Ubuntu can help.
Vagrant Project Setup
1. Start by creating a directory to store your Vagrant file:
sudo mkdir vagrant-testcd vagrant-test2. Download the Ubuntu Trusty Tahr distribution from a common library and create a basic Vagrantfile with:
vagrant init ubuntu/trusty64If you like, you can browse to https://app.vagrantup.com/boxes/search and download a Vagrantbox of your choosing.
When you run the init command, Vagrant installs the box to the current directory. The Vagrantfile is placed in the same directory and can be edited or copied.
Vagrant Boxes
The basic unit in a Vagrant setup is called a “box” or a “Vagrantbox.” This is a complete, self-contained image of an operating system environment.
A Vagrant Box is a clone of a base operating system image. Using a clone speeds up the launching and provisioning process.
1. Instead of using the init command above, you can simply download and add a box with the command:
vagrant box add ubuntu/trusty64This downloads the box and stores it locally.
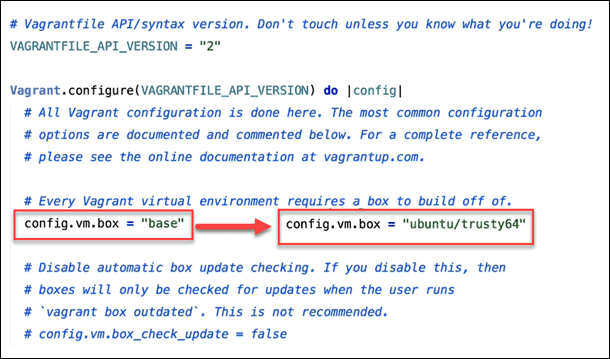
2. Next, you need to configure the Vagrantfile for the virtual box it will serve. Open the Vagrantfile with the command:
sudo vi vagrantfile3. Once the Vagrantfile is open, change the config.vm.box string from “base” to “ubuntu/trusty64”.
config.vm.box = "ubuntu/trusty64"
You can add another line above the end command to specify a box version:
config.vm.box_version = “1.0.1”Or you can specify a URL to link directly to the box:
config.vm.box_url = “https://vagrantcloud.com/ubuntu/trusty64”If you’d like to remove a box, use the following:
vagrant box remove ubuntu/trusty64VagrantFile
Instead of building out a complete operating system image and copying it, Vagrant uses a “Vagrantfile” to specify the configuration of the box.
Note: The download page for each box includes a configuration script that you can copy into your Vagrantfile.
Provisioning
If you spent enough in the guest OS, you may have noticed that it does not come loaded with many applications.
Fortunately, Vagrant supports automatic provisioning through a bootstrap.sh file saved in the same directory as the Vagrantfile.
To add a basic resource monitor, nmon, in the guest OS use the command:
sudo vi bootstrap.shIn that file, enter the following:
#!/usr/bin/env bash

apt-get update

apt-get install -y nmon

if ! [ -L /var/www ]; then

rm -rf /var/www

ln -fs /vagrant /var/www

fi
Save the file and exit. Next, edit the Vagrantfile and add the provisioning line. It should look as follows:
Vagrant.configure("2") do |config|

config.vm.box = "ubuntu/trusty64"

config.vm.provision :shell, path: "bootstrap.sh"

end
When Vagrant reads the Vagrantfile, it is redirected to read the bootstrap.sh file we just created. That bootstrap file will update the package manager, then install the nmon package. If you use vagrant up and vagrant ssh commands, you should now be able to run nmon for a display of the virtual machine’s resources.
Provisioning gives you a powerful tool for pre-configuring your virtual environment. You could also do the same with apache2, and create a web server in your virtual environment.
Note: Learn how to extend a developer workstation running Windows to support a Linux kernel in a VM with the help of Vagrant & Ansible.
Providers
This tutorial shows you how to use Vagrant with VirtualBox. However, Vagrant can also work with many other backend providers.
To launches Vagrant using VMware run the command:
vagrant up –provider=vmware_fusionOr you can launch Vagrant using Amazon Web Services with:
vagrant up –provider=awsOnce the initial command is run, subsequent commands will apply to the same provider.
Launching and Connecting
Vagrant Up
The main command to launch your new virtual environment is:
vagrant upThis will run the software and start a virtual Ubuntu environment quickly. However, even though the virtual machine is running, you will not see any output. Vagrant does not give any kind of user interface.
Vagrant SSH
You can connect to your virtual machine (and verify that it is running) by using an SSH connection:
vagrant sshThis opens a secure shell connection to the new virtual machine. Your command prompt will change to vagrant@trusty64 to indicate that you are logged into the virtual machine.
Once you are done exploring the virtual machine, you can exit the session with CTRL-D. The virtual machine will still be running in the background, but the SSH connection will be closed.
To stop the virtual machine from running, enter:
vagrant destroyThe file you downloaded will remain, but anything that was running inside the virtual machine will be gone.
Synced Folders
Vagrant automatically synchronizes content that is in your project directory with a special directory in the guest (virtual) system. The project directory is the one you created earlier, /vagrant-test. It’s also the same one that holds the Vagrantfile.
When you log into the virtual machine, by default it starts in the /home/vagrant/ directory. A different directory, /vagrant/, holds the same files that are on your host system.
You can use vagrant up and vagrant ssh to launch and log into the virtual machine, then create a test document in the /vagrant directory.
Use the exit command to close the SSH session, then use ls to list the contents of your vagrant-test directory. It should display the test file you created.
This is a handy way to manage files in the guest OS without having to use an SSH session.
Networking
Vagrant includes options to place your virtual machine on a network. At the end of your Vagrantfile, just before the end command, use the config.vm.network command to specify network settings.
For example:
config.vm.network “forwarded_port”, guest: 80, host: 8080For the changes to take place, save and reload Vagrant with the command:
vagrant reloadThis creates a forwarded port for the guest system. You may also define private networks, public networks, and other more advanced options.
Vagrant Share
Vagrant has a handy feature that you can use to share your Vagrant environment using a custom URL.
With your Vagrant environment running, use the following command:
vagrant shareThe system will create a Vagrant Share session, then generate a URL. This URL can be copied and sent to another person. If you have Apache configured in your Vagrant session, anyone who uses this URL can see your Apache configuration page. This URL changes as you modify the contents of your shared folder.
You can close the sharing session with CTRL-C.
For more information, see the Vagrant Sharing documentation.
Clean Up Vagrant
Once you are done working on your guest system, you have a few options how to end the session.
1. To stop the machine and save its current state run:
vagrant suspendYou can resume by running vagrant up again. This is much like putting the machine in sleep mode.
2. To shut down the virtual machine use the command:
vagrant haltAgain, vagrant up will reboot the same virtual machine, and you can resume where you left off. This is much like shutting down a regular machine.
3. To remove all traces of the virtual machine from your system type in the following:
vagrant destroyAnything you have saved in the virtual machine will be removed. This frees up the system resources used by Vagrant.
The next time you vagrant up, the machine will have to be re-imported and re-provisioned. This is much like formatting a hard drive on a system, then reloading a fresh image.
Conclusion
By now, you should be familiar with the essential Vagrant operations. If you followed along with this tutorial for Vagrant, you might even have a virtual OS running right now!
Đăng ký liền tay Nhận Ngay Bài Mới
Subscribe ngay
Cám ơn bạn đã đăng ký !
Lỗi đăng ký !


Add Comment