


trong bài viết này, chúng tôi sẽ hướng dẫn bạn cách cài đặt Zimbra Collaboration 8.8.x Community trên Ubuntu 18.04 LTS server.
Yêu cầu:
Chúng ta cần một số yêu cầu sau để bắt đầu cài đặt:
- Ubuntu 18.04 server
- Có quyền sudo
- Có DNS server
Yêu cầu tài nguyên cho Zimbra server, hỗ trợ lên tới 50 user:
- 4 vCPU hoặc hơn
- 8 GB RAM hoặc hơn
- 50 GB hoặc hơn
- DNS Server
Các bước sau sẽ tiến hành cài đặt và cấu hình Zimbra Collaboration server trên ubuntu 18.04.
Bước 1: Cài đặt và cấu hình Dnsmasq
Trong bài này, chúng ta sẽ sử dụng DNS server là dnsmasq ( hoặc bất kỳ DNS nào tùy bạn ), tham khảo bài post sau để cài đặt dnsmasq : How to Install and Configure Dnsmasq on Ubuntu 18.04 LTS.
Thiết lập Zimbra Domain, DNS server forwarder, và MX records.
$ sudo vim /etc/dnsmasq.conf
server=8.8.8.8
listen-address=127.0.0.1
domain=example.com   # Define domain
mx-host=example.com,mail.example.com,0  # Set MX record for the domain, preference is 0
address=/mail.example.com/192.168.100.10 # Send example.com to 192.168.100.10
Thiết lập server hostname:
sudo hostnamectl set-hostname mail.example.comThêm Server name và IP address vào /etc/hosts file.
$ sudo vim /etc/hosts
192.168.100.10 mail.example.com
Khởi động lại dnsmasq
sudo systemctl restart dnsmasq
Kiểm tra A record của Zimbra Server với Dig
$ dig A zimbra.computingforgeeks.com
 ; <<>> DiG 9.11.3-1ubuntu1.3-Ubuntu <<>> A zimbra.computingforgeeks.com @127.0.0.1
 ;; global options: +cmd
 ;; Got answer:
 ;; ->>HEADER<<- opcode: QUERY, status: NOERROR, id: 14888
 ;; flags: qr aa rd ra; QUERY: 1, ANSWER: 1, AUTHORITY: 0, ADDITIONAL: 1
 ;; OPT PSEUDOSECTION:
 ; EDNS: version: 0, flags:; udp: 4096
 ;; QUESTION SECTION:
 ;zimbra.computingforgeeks.com.    IN  A
 ;; ANSWER SECTION:
 zimbra.computingforgeeks.com. 0    IN  A   192.168.100.10
 ;; Query time: 0 msec
 ;; SERVER: 127.0.0.1#53(127.0.0.1)
 ;; WHEN: Mon Apr 01 21:58:39 CEST 2019
 ;; MSG SIZE  rcvd: 73
Tương tự, kiểm tra MX record. Lúc này nó sẽ trả về địa chỉ IP của Zimbra server của bạn.
$ dig MX computingforgeeks.com
 ; <<>> DiG 9.11.3-1ubuntu1.3-Ubuntu <<>> MX zimbra.computingforgeeks.com @127.0.0.1
 ;; global options: +cmd
 ;; Got answer:
 ;; ->>HEADER<<- opcode: QUERY, status: NOERROR, id: 25343
 ;; flags: qr aa rd ra ad; QUERY: 1, ANSWER: 1, AUTHORITY: 0, ADDITIONAL: 2
 ;; OPT PSEUDOSECTION:
 ; EDNS: version: 0, flags:; udp: 4096
 ;; QUESTION SECTION:
 ;zimbra.computingforgeeks.com.    IN  MX
 ;; ANSWER SECTION:
 zimbra.computingforgeeks.com. 0    IN  MX  0 zimbra.computingforgeeks.com.
 ;; ADDITIONAL SECTION:
 zimbra.computingforgeeks.com. 0    IN  A   192.168.100.10
 ;; SERVER: 127.0.0.1#53(127.0.0.1)
 ;; WHEN: Mon Apr 01 21:59:40 CEST 2019
 ;; MSG SIZE  rcvd: 117
Ok, giờ chúng ta đã có A record và MX trên DNS. Tiếp tục cài đặt.
Bước 2: Download Zimbra Collaboration Open Source Edition
Bạn có thể tìm bản mới nhất tại đây, ngay tại thời điểm viết bài này là 8.8.15. Tiến hành tải file về server.
wget https://files.zimbra.com/downloads/8.8.15_GA/zcs-8.8.15_GA_3869.UBUNTU18_64.20190918004220.tgzExtract file:
tar xvf zcs-8.8.15_GA_3869.UBUNTU18_64.20190918004220.tgzDi chuyển vào thư mục zcs-*
cd zcs*/Bước 3: Cài đặt Zimbra Collaboration trên Ubuntu 18.04 LTS
Như vậy, chúng ta đã sẵn sàng để bắt đầu cài đặt.
Chạy script cài đặt.
# sudo ./install.sh

Operations logged to /tmp/install.log.DM7y8xw8
Checking for existing installation...
    zimbra-drive...NOT FOUND
    zimbra-imapd...NOT FOUND
    zimbra-patch...NOT FOUND
    zimbra-mta-patch...NOT FOUND
    zimbra-proxy-patch...NOT FOUND
    zimbra-license-tools...NOT FOUND
    zimbra-license-extension...NOT FOUND
    zimbra-network-store...NOT FOUND
    zimbra-network-modules-ng...NOT FOUND
    zimbra-chat...NOT FOUND
    zimbra-talk...NOT FOUND
    zimbra-ldap...NOT FOUND
    zimbra-logger...NOT FOUND
    zimbra-mta...NOT FOUND
    zimbra-dnscache...NOT FOUND
    zimbra-snmp...NOT FOUND
    zimbra-store...NOT FOUND
    zimbra-apache...NOT FOUND
    zimbra-spell...NOT FOUND
    zimbra-convertd...NOT FOUND
    zimbra-memcached...NOT FOUND
    zimbra-proxy...NOT FOUND
    zimbra-archiving...NOT FOUND
    zimbra-core...NOT FOUND


----------------------------------------------------------------------
PLEASE READ THIS AGREEMENT CAREFULLY BEFORE USING THE SOFTWARE.
SYNACOR, INC. ("SYNACOR") WILL ONLY LICENSE THIS SOFTWARE TO YOU IF YOU
FIRST ACCEPT THE TERMS OF THIS AGREEMENT. BY DOWNLOADING OR INSTALLING
THE SOFTWARE, OR USING THE PRODUCT, YOU ARE CONSENTING TO BE BOUND BY
THIS AGREEMENT. IF YOU DO NOT AGREE TO ALL OF THE TERMS OF THIS
AGREEMENT, THEN DO NOT DOWNLOAD, INSTALL OR USE THE PRODUCT.

License Terms for this Zimbra Collaboration Suite Software:
https://www.zimbra.com/license/zimbra-public-eula-2-6.html
----------------------------------------------------------------------
3.1. Gõ “Y” để chấp nhận các điều khoản và bắt đầu cài đặt.
Do you agree with the terms of the software license agreement? [N] Y
3.2. Đồng ý sử dụng các Zimbra package repository
Use Zimbra's package repository [Y] Y
Warning: apt-key output should not be parsed (stdout is not a terminal)
Importing Zimbra GPG key
Configuring package repository
Checking for installable packages
Found zimbra-core (local)
Found zimbra-ldap (local)
Found zimbra-logger (local)
Found zimbra-mta (local)
Found zimbra-dnscache (local)
Found zimbra-snmp (local)
Found zimbra-store (local)
Found zimbra-apache (local)
Found zimbra-spell (local)
Found zimbra-memcached (repo)
Found zimbra-proxy (local)
Found zimbra-drive (repo)
Found zimbra-imapd (local)
Found zimbra-patch (repo)
Found zimbra-mta-patch (repo)
Found zimbra-proxy-patch (repo)
3.3. Chọn các gói muốn cài đặt.
Install zimbra-ldap [Y]
Install zimbra-logger [Y]
Install zimbra-mta [Y]
Install zimbra-dnscache [Y]
Install zimbra-snmp [Y]
Install zimbra-store [Y]
Install zimbra-apache [Y]
Install zimbra-spell [Y]
Install zimbra-memcached [Y]
Install zimbra-proxy [Y]
Install zimbra-drive [Y]
Install zimbra-imapd (BETA - for evaluation only) [N]
Install zimbra-chat [Y]

Checking required space for zimbra-core
Checking space for zimbra-store
Checking required packages for zimbra-store
zimbra-store package check complete.

Installing:
    zimbra-core
    zimbra-ldap
    zimbra-logger
    zimbra-mta
    zimbra-dnscache
    zimbra-snmp
    zimbra-store
    zimbra-apache
    zimbra-spell
    zimbra-memcached
    zimbra-proxy
    zimbra-drive
    zimbra-patch
    zimbra-mta-patch
    zimbra-proxy-patch
    zimbra-chat
3.4. Nhấn “Y”
The system will be modified. Continue? [N] YHệ thống sẽ bắt đầu các gói và tiến hành cài đặt.
Downloading packages (12):
   zimbra-core-components
   zimbra-ldap-components
   zimbra-mta-components
   zimbra-dnscache-components
   zimbra-snmp-components
   zimbra-store-components
   zimbra-jetty-distribution
   zimbra-apache-components
   zimbra-spell-components
   zimbra-memcached
   zimbra-proxy-components
   zimbra-mta-patch
     ...done

Removing /opt/zimbra
Removing zimbra crontab entry...done.
Cleaning up zimbra init scripts...done.
Cleaning up /etc/security/limits.conf...done.

Finished removing Zimbra Collaboration Server.

Installing repo packages (12):
   zimbra-core-components
   zimbra-ldap-components
   zimbra-mta-components
   zimbra-dnscache-components
   zimbra-snmp-components
   zimbra-store-components
   zimbra-jetty-distribution
   zimbra-apache-components
   zimbra-spell-components
   zimbra-memcached
   zimbra-proxy-components
   zimbra-mta-patch
      ...
3.5. Thiết lập account password 7>4
7) zimbra-store:                            Enabled
        +Create Admin User:                    yes
        +Admin user to create:                 [email protected]
******* +Admin Password                        UNSET
        +Anti-virus quarantine user:           [email protected]
        +Enable automated spam training:       yes
        +Spam training user:                   [email protected]
        +Non-spam(Ham) training user:          [email protected]
        +SMTP host:                            zimbra.computingforgeeks.com
        +Web server HTTP port:                 8080
        +Web server HTTPS port:                8443
        +Web server mode:                      https
        +IMAP server port:                     7143
        +IMAP server SSL port:                 7993
        +POP server port:                      7110
        +POP server SSL port:                  7995
        +Use spell check server:               yes
        +Spell server URL:                     //zimbra.computingforgeeks.com:7780/aspell.php
        +Enable version update checks:         TRUE
        +Enable version update notifications:  TRUE
        +Version update notification email:    [email protected]
        +Version update source email:          [email protected]
        +Install mailstore (service webapp):   yes
        +Install UI (zimbra,zimbraAdmin webapps): yes
.....
Password for [email protected] (min 6 characters): [8441mra12P]
Hoàn tất cấu hình và apply.
Main menu
 1) Common Configuration:
    2) zimbra-ldap:                             Enabled
    3) zimbra-logger:                           Enabled
    4) zimbra-mta:                              Enabled
    5) zimbra-dnscache:                         Enabled
    6) zimbra-snmp:                             Enabled
    7) zimbra-store:                            Enabled
    8) zimbra-spell:                            Enabled
    9) zimbra-proxy:                            Enabled
   10) Default Class of Service Configuration:
    s) Save config to file
    x) Expand menu
    q) Quit
 *** CONFIGURATION COMPLETE - press 'a' to apply
 Select from menu, or press 'a' to apply config (? - help) a
 Save configuration data to a file? [Yes] <Enter>
 Save config in file: [/opt/zimbra/config.24171]
 Saving config in /opt/zimbra/config.24171…done.
 The system will be modified - continue? [No] Yes
Scripts cài đặt sẽ bắt đầu và cấu hình Zimbra server. Khi quá trình hoàn tất, bạn sẽ thấy output như sau:
Starting servers...done.
Installing common zimlets...
com_zimbra_cert_manager...done.
com_zimbra_adminversioncheck...done.
com_zimbra_attachcontacts...done.
com_zimbra_viewmail...done.
com_zimbra_attachmail...done.
com_zimbra_url...done.
com_zimbra_webex...done.
com_zimbra_bulkprovision...done.
com_zimbra_proxy_config...done.
com_zimbra_mailarchive...done.
com_zextras_chat_open...done.
com_zimbra_ymemoticons...done.
com_zimbra_clientuploader...done.
com_zimbra_date...done.
com_zimbra_srchhighlighter...done.
com_zimbra_tooltip...done.
com_zextras_drive_open...done.
com_zimbra_phone...done.
com_zimbra_email...done.
Finished installing common zimlets.
Restarting mailboxd...done.
Creating galsync account for default domain...done.
You have the option of notifying Zimbra of your installation.
This helps us to track the uptake of the Zimbra Collaboration Server.
The only information that will be transmitted is:
The VERSION of zcs installed (8.8.12_GA_3794_UBUNTU18_64)
The ADMIN EMAIL ADDRESS created ([email protected])
Notify Zimbra of your installation? [Yes]
Checking if the NG started running...done.
Setting up zimbra crontab...done.
Moving /tmp/zmsetup.20190401-221739.log to /opt/zimbra/log
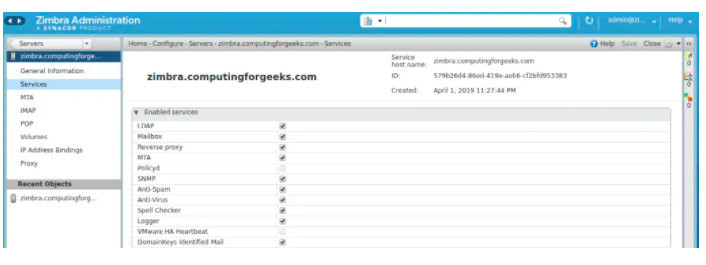
Configuration complete - press return to exit Confirm Zimbra services status.
# su - zimbra -c "zmcontrol status"
Host zimbra.computingforgeeks.com
     amavis                  Running
     antispam                Running
     dnscache                Running
     ldap                    Running
     logger                  Running
     mailbox                 Running
     memcached               Running
     mta                     Running
     opendkim                Running
     proxy                   Running
     service webapp          Running
     snmp                    Running
     spell                   Running
     stats                   Stopped
     zimbra webapp           Running
     zimbraAdmin webapp      Running
     zimlet webapp           Running
     zmconfigd               Running
Bước 4: Truy cập Zimbra Admin Dashboard
Truy cập Admin interface : https://ip-addres|hostname:7071
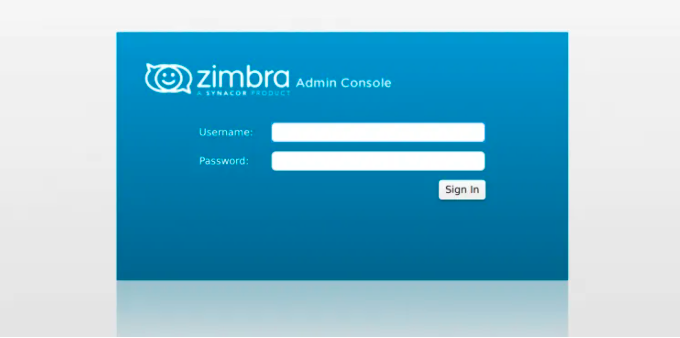
Login với username admin và password đã được cấu hình trước đó.
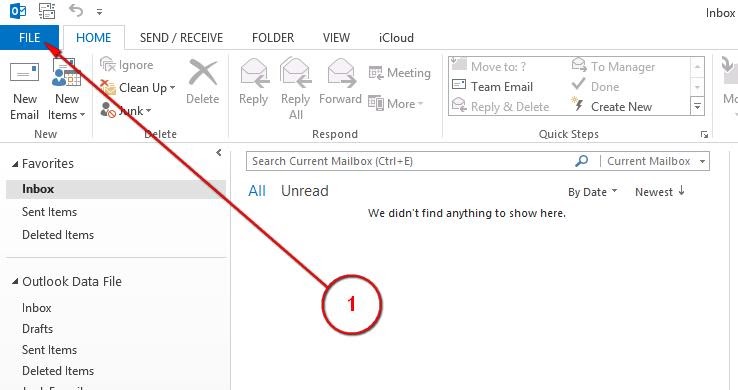
Bước 5: Cài đặt Email Zimbra trên Outlook
Để cấu hình Email Zimbra trên Outlook, bạn thực hiện theo các bước sau. Lưu ý, ví dụ minh họa sẽ lấy giao diện của Outlook 2013, những phiên bản Outlook khác có thể khác nhau một chút về phần giao diện nhưng các thao tác thực hiện đều tương tự.
Bước 1. Bạn khởi động Outlook và chọn mục File.
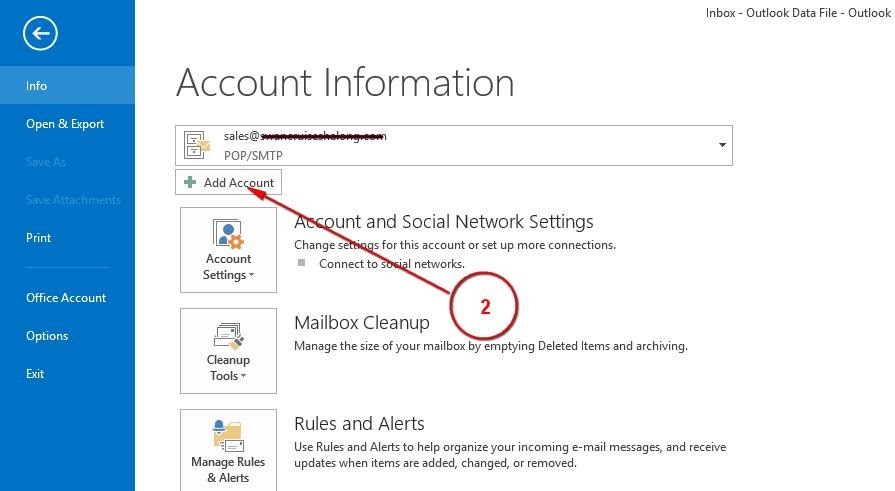
Bước 2: Bạn nhấn nút Add Account để bắt đầu tiến trình cài đặt.
Bước 3: Bạn tick chọn Manual setup or additional server types và nhấn nút Next.

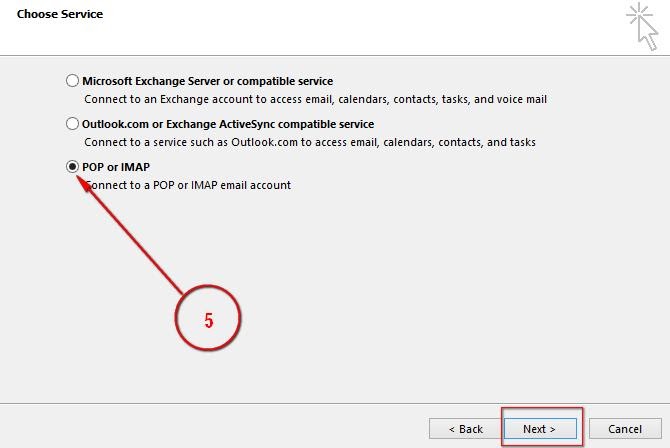
Bước 4: Bạn tick chọn POP or IMAP rồi nhấn nút Next để được chuyển sang màn hình bước kế tiếp.
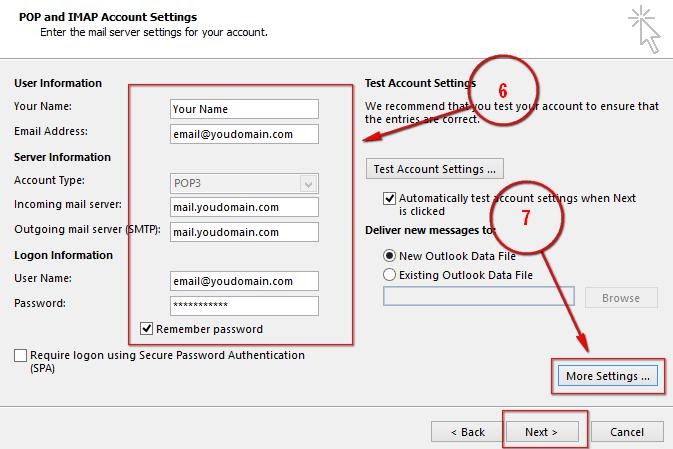
Bước 5: Trong cửa sổ POP and IMAP Acount Settings, bạn nhập các thông tin như hệ thống yêu cầu rồi click nút More Settings.
Bước 6: Thực hiện cấu hình theo các lựa chọn của màn hình mới xuất hiện.
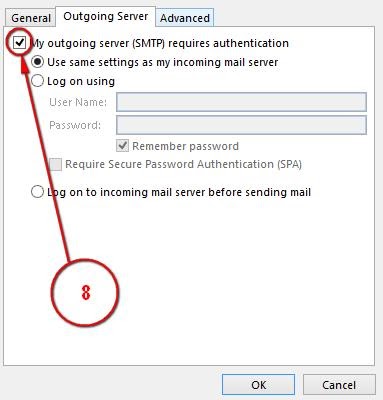
Tại Outgoing Server, tick chọn My outgoing server (SMTP) requires authentication.
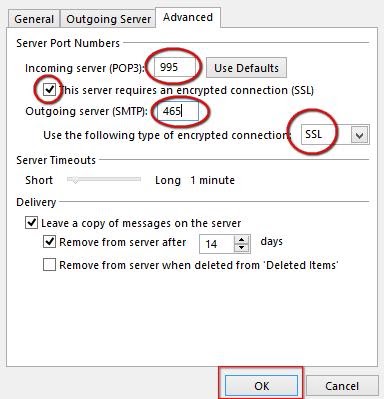
– Tại tab Advanced, bạn cấu hình như hình sau.
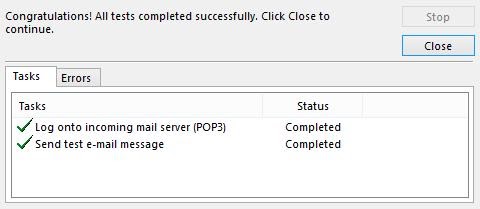
Sau đó, bạn click OK để hoàn tất cài đặt. Màn hình bên dưới hiển thị quá trình cài đặt thành công.
Nguồn:
Nhấn Subcribe để nhận thêm nhiều bài viết mới Like Facebook
[maxbutton id=”2″ ] [maxbutton id=”3″ ]


Add Comment