


Introduction
Node.js is a run-time environment which includes everything you need to execute a program written in JavaScript. It’s used for running scripts on the server to render content before it is delivered to a web browser.
NPM stands for Node Package Manager, which is an application and repository for developing and sharing JavaScript code.
This guide will help you install and update Node.js and NPM on a Windows system and other useful Node.js commands.
Prerequisites
- A user account with administrator privileges (or the ability to download and install software)
- Access to the Windows command line (search > cmd > right-click > run as administrator) OR Windows PowerShell (Search > Powershell > right-click > run as administrator)
Note: If you want to install the run-time environment on a different operating systems, check out our guides on installing Node.js and NPM on CentOS 7, How to Install Node.js on Debian, or How to Install Node.js and NPM on Mac.
How to Install Node.js and NPM on Windows
Step 1: Download Node.js Installer
In a web browser, navigate to https://nodejs.org/en/download/. Click the Windows Installer button to download the latest default version. At the time this article was written, version 10.16.0-x64 was the latest version. The Node.js installer includes the NPM package manager.
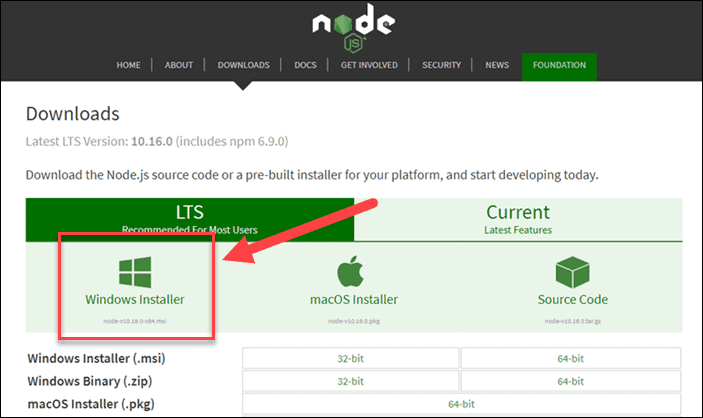
Note: There are other versions available. If you have an older system, you may need the 32-bit version. You can also use the top link to switch from the stable LTS version to the current version. If you are new to Node.js or don’t need a specific version, choose LTS.
Step 2: Install Node.js and NPM from Browser
1. Once the installer finishes downloading, launch it. Open the downloads link in your browser and click the file. Or, browse to the location where you have saved the file and double-click it to launch.
2. The system will ask if you want to run the software – click Run.
3. You will be welcomed to the Node.js Setup Wizard – click Next.
4. On the next screen, review the license agreement. Click Next if you agree to the terms and install the software.
5. The installer will prompt you for the installation location. Leave the default location, unless you have a specific need to install it somewhere else – then click Next.
6. The wizard will let you select components to include or remove from the installation. Again, unless you have a specific need, accept the defaults by clicking Next.
7. Finally, click the Install button to run the installer. When it finishes, click Finish.
Step 3: Verify Installation
Open a command prompt (or PowerShell), and enter the following:
node -vThe system should display the Node.js version installed on your system. You can do the same for NPM:
npm -v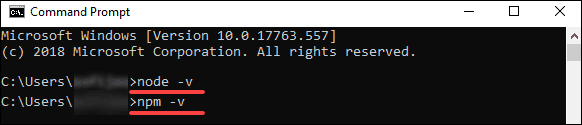
If npm is not recognized or properly installed, command prompt will display the following error message: npm: command not found.
How to Update Node.js and NPM on Windows
The easiest way to update Node.js and NPM is to download the latest version of the software. On the Node.js download page, right below the Windows Installer link, it will display the latest version. You can compare this to the version you have installed.
To upgrade, download the installer and run it. The setup wizard will overwrite the old version, and replace it with the new version.
How to Uninstall Node.js and NPM on Windows
You can uninstall Node.js from the Control Panel in Windows.
To do so:
- Click the Start button > Settings (gear icon) > Apps.
- Scroll down to find Node.js and click to highlight.
- Select Uninstall. This launches a wizard to uninstall the software.
Basic Node.js Usage
Node.js is a framework, which means that it doesn’t work as a normal application. Instead, it interprets commands that you write. To test your new Node.js installation, create a Hello World script.
1. Start by launching a text editor of your choice.
2. Next, copy and paste the following into the text editor you’ve just opened:
var http = require('http');
 http.createServer(function (req, res) {
   res.writeHead(200, {'Content-Type': 'text/html'});
   res.end('Hello World!');
 }).listen(8080);
3. Save the file, then exit. Open the PowerShell, and enter the following:
node users<your_username>myprogram.jsIt will look like nothing has happened. In reality, your script is running in the background. You may see a Windows Defender notice about allowing traffic – for now, click Allow.
4. Next, open a web browser, and enter the following into the address bar:
http://localhost:8080In the very upper-left corner, you should see the text Hello World!
Right now, your computer is acting like a server. Any other computer that tries to access your system on port 8080 will see the Hello World notice.
To turn off the program, switch back to PowerShell and press Ctrl+C. The system will switch back to a command prompt. You can close this window whenever you are ready.
Conclusion
You should now be able to install both the Node.js framework, and the NPM package manager. You’ve also written your first node.js JavaScript program!
The NPM framework gives access to many different JavaScript solutions, which can be found at npmjs.com.

Add Comment