


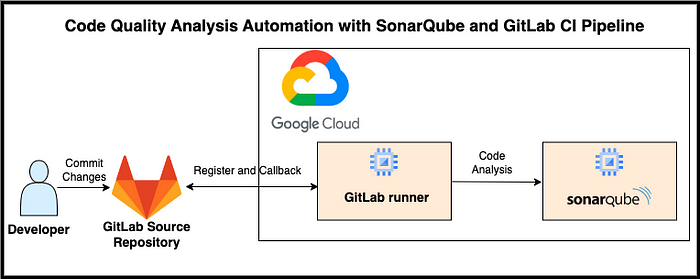
Developer is working on source code using GitLab as version control system and GitLab CI/CD for automating development pipeline. By integrating SonarQube, an open-source platform for continuous code quality inspection, we can add an extra layer of code analysis to CI pipeline. Integrating SonarQube with GitLab CI enables us to perform static code analysis on source code. SonarQube scans the code for potential bugs, code smells, and vulnerabilities. It provides detailed reports highlighting areas that require attention, such as complex code, potential security vulnerabilities, or violations of coding best practices. SonarQube analyzes the code changes made in each commit and provides feedback on code quality and potential issues. This ensures that our code adheres to industry standards and maintains high quality. Integrating SonarQube with GitLab CI empowers teams to automate code quality checks seamlessly as part of the CI pipeline.
Approach
We will configure two servers with Ubuntu 20.04 operating system. The first server will be dedicated for configuration of SonarQube. The second server will be used for configuring self hosted GitLab Runner. Self-hosted runners allow us to run CI/CD pipelines in environments that are isolated from the internet or have restricted network access. Using self-hosted runners can be more cost-effective compared to using shared runners provided by GitLab. With a self-hosted runner, we have full control over the infrastructure where the code is executed and allows us to ensure the security and compliance requirements.
GitLab
The DevSecOps Platform
From planning to production, bring teams together in one application. Ship secure code more efficiently to deliver…
about.gitlab.com
GitLab Runner
GitLab Runner | GitLab
Documentation for GitLab Community Edition, GitLab Enterprise Edition, Omnibus GitLab, and GitLab Runner.
docs.gitlab.com
SonarQube
SonarQube 10.1
SonarQube is a self-managed, automatic code review tool that systematically helps you deliver clean code. As a core…
docs.sonarqube.org
SonarQube Configuration
Refer this blog for SonarQube configuration:
Streamlined and Resilient CI/CD Automation with Jenkins on Google Cloud
Use Case
blog.searce.com
GitLab Runner Configuration
Install Docker on the server because we will use docker as executor.
Install Docker Engine on Ubuntu
Jumpstart your client-side server applications with Docker Engine on Ubuntu. This guide details prerequisites and…
docs.docker.com
Now run the following commands to configure GitLab Runner :
sudo curl -L --output /usr/local/bin/gitlab-runner \
https://gitlab-runner-downloads.s3.amazonaws.com/latest/binaries/gitlab-runner-linux-amd64
sudo chmod +x /usr/local/bin/gitlab-runner
sudo useradd --comment 'GitLab Runner' \
--create-home gitlab-runner --shell /bin/bash
sudo gitlab-runner install --user=gitlab-runner \
--working-directory=/home/gitlab-runner
sudo gitlab-runner start
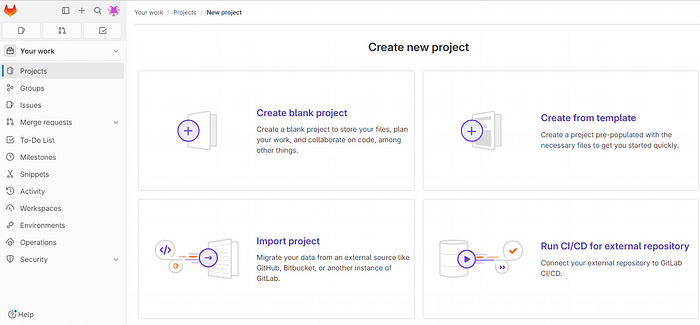
Now Login to GitLab account and create a new project.
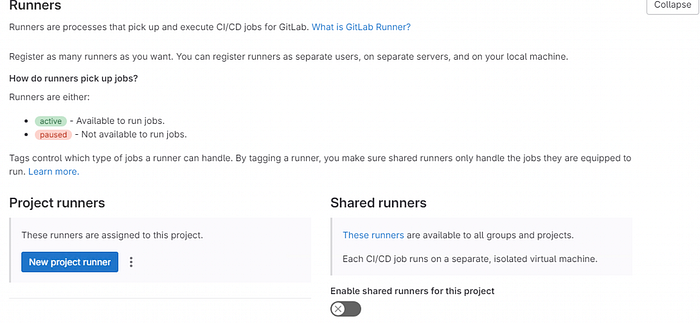
In Settings, click on CI/CD and click on Expand in Runners.

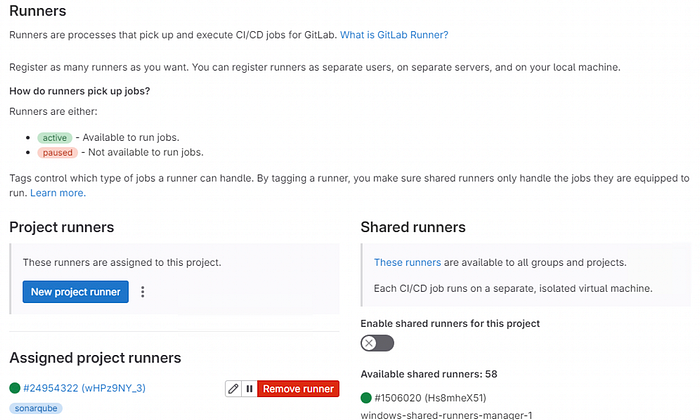
Disable the shared runners because we are going to use self-hosted runners instead of shared runners, then click on New Project Runner.
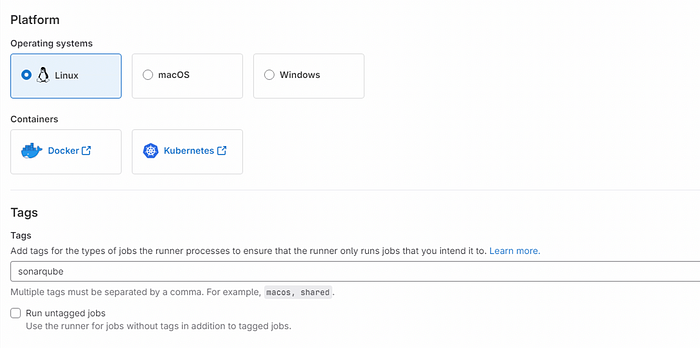
Select Linux as Operating system and give a tag (sonarqube) which will be used in our pipeline to select this runner.
Now copy the command provided in the next step and run on GitLab runner server.
gitlab-runner register --url https://gitlab.com --token $TOKEN
Select docker as executor and enter docker as image name in the prompt of this command.
After successfully registering the runner, Run the following command.
gitlab-runner run
We can see the registered runner in the GitLab interface.
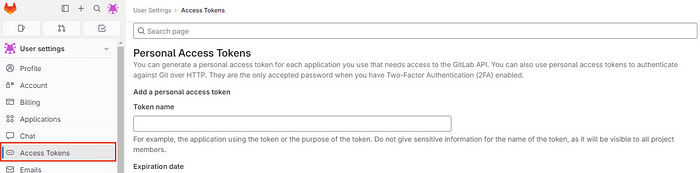
Now create a personal access token in GitLab for authenticating SonarQube with GitLab.
Project Creation in SonarQube:
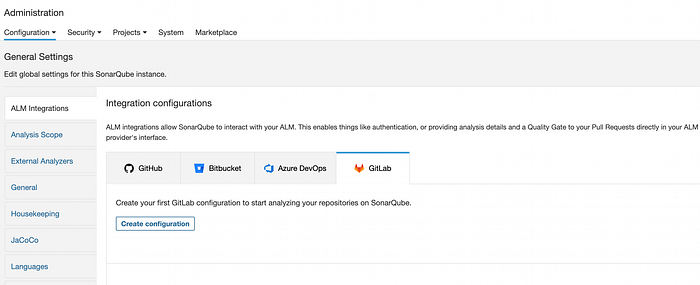
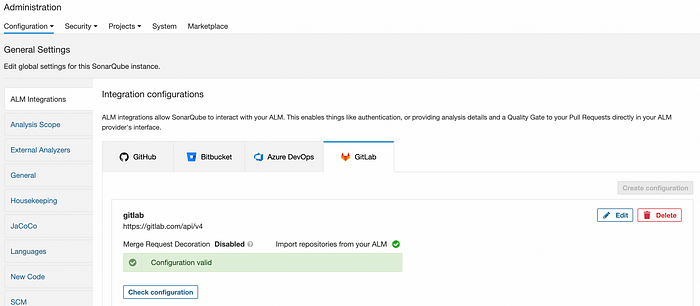
In SonarQube, go to Administration => Configuration => ALM Integration => GitLab
Click on Create Configuration.
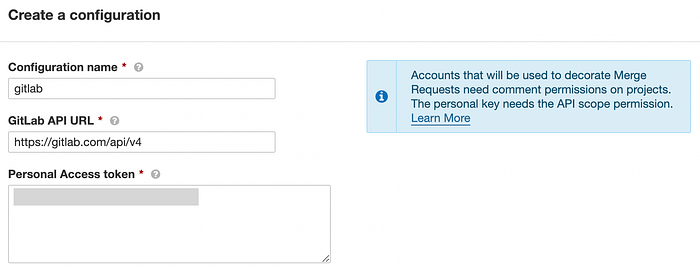
Give any Configuration name (gitlab), enter https://gitlab.com/api/v4 as GitLab API URL, and enter the Personal Access token generated in GitLab.
After saving the configuration, we can see configuration is valid.
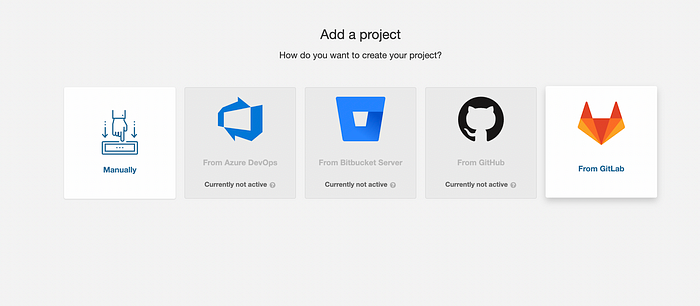
Now add a project in SonarQube and select From GitLab.
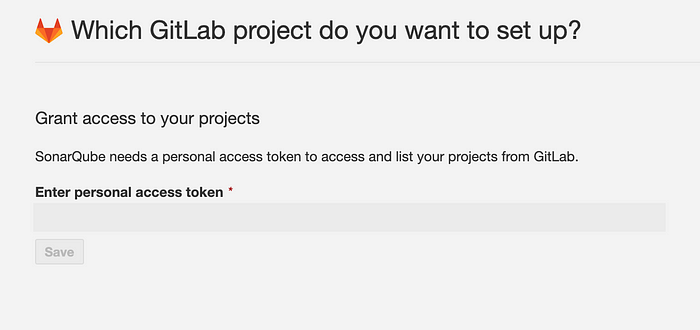
In the next step enter personal access token generated in GitLab.
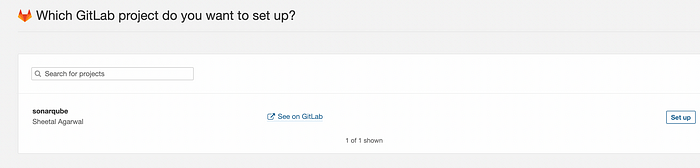
In the next step we can see the project of our GitLab and click on Set up .
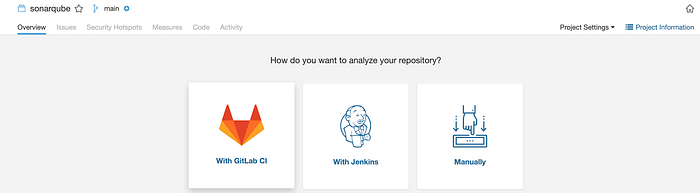
In the next step select With GitLab CI.
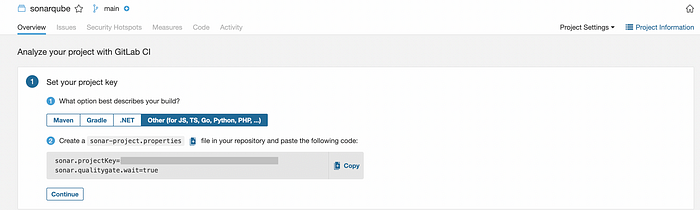
In the next step we can select the language or the framework with respect to our source code.
Create a file name sonar-project.properties in GitLab Project and save the code provided in the next step in SonarQube.
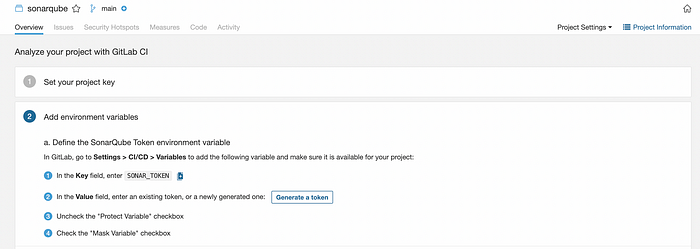
Now in next step, click on Generate a token. Add variable in GitLab named SONAR_TOKEN and give the token generated as values. Uncheck the “Protect variable” checkbox and check the “Mask variable” checkbox.
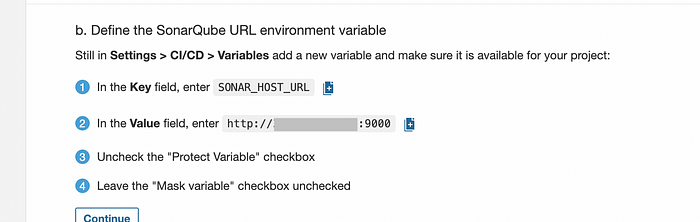
Add another variable in GitLab named SONAR_HOST_URL and provide the value given in SonarQube. Uncheck the “Protect variable” checkbox.
Add the .gitlab-ci.yml file in GitLab project for continuous integration.
.gitlab-ci.yml
stages:
  - sonarqube-check

sonarqube-check:
  stage: sonarqube-check
  tags:
      - sonarqube  # name of gitlab runner tag
  image:
    name: sonarsource/sonar-scanner-cli:latest
    entrypoint: [""]
  variables:
    SONAR_USER_HOME: "${CI_PROJECT_DIR}/.sonar"  # Defines the location of the analysis task cache
    GIT_DEPTH: "0"  # Tells git to fetch all the branches of the project, required by the analysis task
  cache:
    key: "${CI_JOB_NAME}"
    paths:
      - .sonar/cache
  script:
    - sonar-scanner
  allow_failure: true
  only:
    - main # the name of branch
Pipeline Execution:

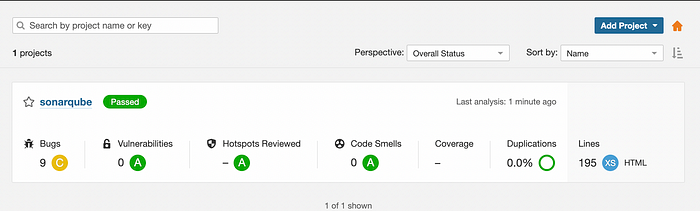
SonarQube Project :
We can see the detailed analysis of code in SonarQube project.
Conclusion
We have integrated SonarQube with GitLab CI Pipeline for seamless workflow that not only automates repetitive tasks but also provides valuable feedback on code quality and bridges the gap between code development and code analysis.

Add Comment