


Introduction
Ubuntu 24.04 Noble Numbat is the latest long-term support (LTS) release, launched on 25 April 2024. It comes with five years of support and an additional seven years of security updates if you purchase the Ubuntu Pro premium subscription service.
This tutorial shows how to install Ubuntu 24.04 and lists the key features of the new OS.

Prerequisites
- A working internet connection.
- An 8GB or larger USB drive for the ISO image.
- A machine with at least 25GB of free space and 4GB of RAM.
Note: Learn how to check disk space in Linux.
How to Install Ubuntu 24.04
Installing Ubuntu 24.04 Noble Numbat is a straightforward process. This section will guide you through the essential steps, from downloading the ISO file to completing the installation on your system.
Download Ubuntu 24.04 ISO
The first step is to download the Ubuntu ISO file from the official website. Use a web browser of your choice or download the file using the wget command.
wget https://releases.ubuntu.com/noble/ubuntu-24.04-desktop-amd64.iso
The file size is about 6GB, so the download may take some time, depending on your connection speed.
Create Bootable USB
After downloading the ISO file, create a bootable USB to install Ubuntu. There are different ways to create a bootable USB, depending on your operating system and preference.
Create Bootable USB on Ubuntu
If you are using Ubuntu, create a bootable USB with the Startup Disk Creator utility, which comes preinstalled. Follow the steps below:
1. Click the Show Applications button and type Startup Disk Creator in the search bar. Press Enter to open the app.

2. Click the Other… button in the Source disc image section and locate the Ubuntu 24.04 ISO file you previously downloaded.
3. Insert the USB device, and the app should automatically select it in the Disk to use section.
4. Finally, click the Make Startup Disk button to create the bootable USB device.

Create Bootable USB on Windows
The easiest way to create a bootable USB in Windows is to use Rufus, a third-party utility. Follow the steps below:
1. Open a web browser and navigate to the official Rufus page. Scroll down to the Download section and click the link to download the latest standard or portable Rufus version.
Choose Portable if you want to use the app without modifying your system. Alternatively, choose Standard if you want to install the app. For this tutorial, we will use the Portable version.

2. When the download completes, double-click the file to run the app. When prompted to allow Rufus to check for online updates, select No, and the app opens.
3. Insert the USB drive and configure the following:
- Click the Device dropdown menu and select your USB device if it was not automatically selected.
- Under Boot Selection, click the SELECT button on the right and locate the Ubuntu 24.04 ISO file you previously downloaded.
4. Click the START button and Rufus begins formatting the device and writing the image. Wait for the process to complete and exit Rufus.

Boot Ubuntu from USB
After creating the bootable USB, boot from it to install Ubuntu 24.04. Follow the steps below:
1. Restart your machine and keep the USB device plugged in.
2. Enter the boot menu to ensure you boot from the USB device first. The boot menu key is different based on the machine manufacturer. The most common keys for bringing up the boot menu are F12, Escape, F2, and F10.
Note: If you are not sure how to access the boot menu on your machine, look for a brief message when your system starts. The message often states which key to press to load the boot menu.
Tap the key as soon as the machine powers on.
3. In the boot menu, use the arrow keys to pick the Ubuntu USB device. Confirm your changes and the system loads the GRUB bootloader.
Select the Try or Install Ubuntu option and press Enter to confirm.

Start Ubuntu 24.04 Installation
After selecting the Try or Install Ubuntu option from the GRUB bootloader, the Ubuntu installation wizard appears and allows you to choose the preferred language for the installation. Select your language from the list and click Next to start the installation.

Configure Accessibility
The first setting to configure is accessibility in Ubuntu. If you have any visual or hearing impairments or need assistance with using the OS, this is where you can enable various settings. You can increase the contrast, enable the screen reader, enable visual alerts or desktop zoom, etc.
When you finish, click Next to continue the installation.

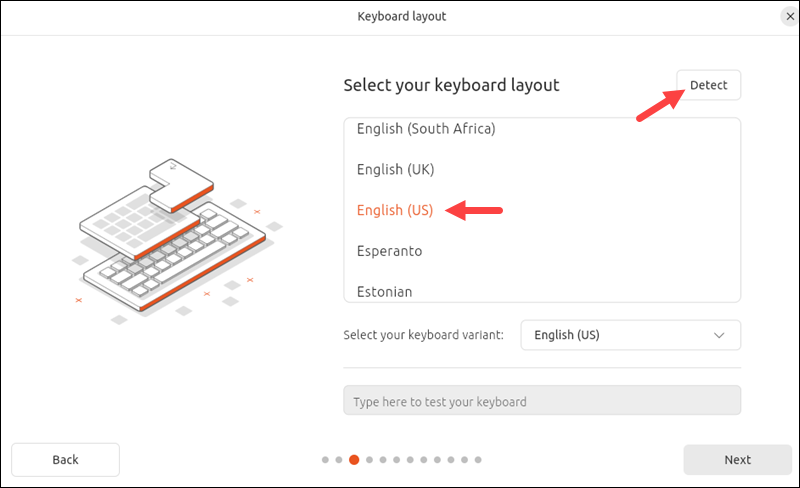
Set Keyboard Layout
Use the Detect option to automatically detect your keyboard layout, or choose one from the list. Click Next to proceed.
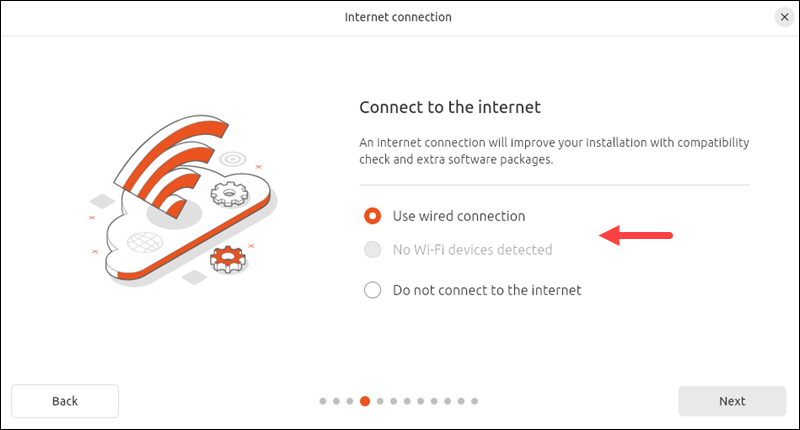
Connect to the Internet
Select your connection type and connect to the Internet. You can skip this step, but then Ubuntu cannot download any additional resources during the installation. In this tutorial, we are using a wired connection.
If you are using WiFi, select your network from the list and provide the password to connect.
Click Next to continue.
Update Installer
After connecting to the Internet, the installer checks for updates and lets you know if any are available. You can choose to update the installer or skip and continue with the installation.
If you choose to update, click Update now and wait for it to finish. The installer automatically installs updates and prompts you to close it and relaunch the installation, starting from the beginning.
For this tutorial, we will Skip the update.

Install or Try Ubuntu
In this step, the wizard prompts whether you want to install or try Ubuntu without making any changes. Keep the Install Ubuntu option selected and click Next.

Choose Installation Type
The installation type allows you to choose between two installation types:
- The interactive installation. The standard option that allows you to configure all the settings yourself.
- The automated installation. This type requires internet access and allows you to download a (YAML) configuration file from a web server to standardize multiple installations.
For this tutorial, we will go with the interactive installation. Make your selection and click Next.

Select App Package
Next, select which selection of apps to install with the system:
- The default selection includes the essential apps, such as the web browser and basic utilities, and excludes apps, such as the video player and office suite. You can later install more apps using the App Center.
- The extended selection is a full installation with additional office tools and utilities, which are useful for offline work.
Choose which apps to install and click Next.

Install Additional Software
The next step prompts you to install third-party software to improve your device’s performance (such as NVIDIA graphics drivers and support for additional media formats).
Check both boxes to ensure the best performance and support, and click Next.

Partition the Disk
The next step is to partition the disk for the installation. If you plan to use Ubuntu as the only operating system on your hard drive, select Erase disk and install Ubuntu.
Warning: Make sure to back up any existing data on the disk because the process will format it and erase everything.
Click the Advanced features… button if you want to implement LVM (Logical Volume Management), encryption, or ZFS (Zettabyte File System) on your hard drive. Note that ZFS is still experimental.

Choose Manual installation if you are an advanced user and want to create specific configurations for your use case.
For this tutorial, we will select the first option to erase the disk and install Ubuntu from scratch. After making your choice, click Next to continue.

Create an Account
Next, create a user account for Ubuntu. Provide your name, the computer name, the account username, and choose a password.

Tip: Check out our strong password ideas or try our free password generator.
After providing the information, click Next.
Select Time Zone
The wizard automatically detects your location and time zone. You can also manually set them by clicking the map. After you set the time zone and location, click Next to proceed to the final step.

Install Ubuntu
The last step is to review your choices and install Ubuntu if everything checks out. If you want to make changes, return to the step you want to change. Otherwise, click the Install button to start the installation process.

Note: If you had chosen the automated installation earlier, the wizard would immediately take you to this screen to confirm that your configuration file has been installed correctly.
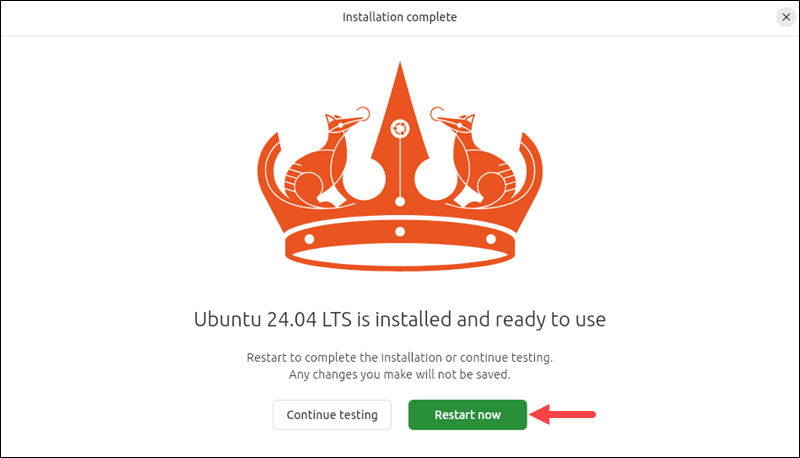
Wait for the process to complete. Remove the USB and click the Restart now button to boot into the new OS.
Ubuntu 24.04 Noble Numbat New Features
The key new features of the Ubuntu 24.04 operating system are:
- New Desktop installer with autoinstall support. Utilizes a unified Subiquity backend and a new Flutter-based frontend for a consistent and enhanced installation experience, including graphical autoinstall capabilities.
- New Kernel. Ubuntu 24.04 comes with the latest mainline Linux kernel 6.8.
- New App Center and dedicated firmware updater. Introduces a modern App Center with improved app discovery, user ratings, and separates firmware updates into a dedicated application for better performance and management.
- GNOME 46. Includes the latest GNOME version with usability enhancements like quarter screen tiling, expandable notifications, and consolidated settings.
- Advanced Active Directory Group Policy Object (GPO) support. Expands GPO support, allowing comprehensive configuration and management of Ubuntu instances in enterprise environments.
- Experimental TPM-backed full disk encryption and ZFS encryption. Adds experimental support for hardware-backed full disk encryption (TPM) and reintroduces ZFS-guided install with encryption options.
- Netplan 1.0 integration. Standardizes networking configurations across desktop and server with Netplan 1.0, offering improved wireless compatibility and usability features.
- Secure PPA management. Enhances PPA security with deb822-formatted.sources files, embedding signing keys, and requiring stronger key algorithms for added security.
- Selective proposed pocket updates. Allows users to selectively test updates from the proposed pocket without risking system stability, enhancing pre-release testing capabilities.
Conclusion
After following the instructions in this tutorial, you have successfully installed the latest Ubuntu 24.04 Noble Numbat on your machine.
Next, see how you can reinstall Ubuntu in case of system failure or see how to remove unwanted packages in Ubuntu.
Đăng ký liền tay Nhận Ngay Bài Mới
Subscribe ngay
Cám ơn bạn đã đăng ký !
Lỗi đăng ký !
Add Comment