


How to Install Vaultwarden with Docker on Ubuntu 22.04
Vaultwarden is an unofficial port of Bitwarden server written in Rust language. It is compatible with the official Bitwarden clients and is less resource-heavy than Bitwarden. It implements almost all features of Bitwarden barring a few. It uses the Bitwarden API to provide features like organization support, attachments, authenticator, U2F, Yubikey, Duo support, and support for email alias services.
In this tutorial, you will learn how to set up your copy of Vaultwarden on a Ubuntu 22.04 server.
Prerequisites
-
A server running Ubuntu 22.04.
-
A non-root user with sudo privileges.
-
The uncomplicated Firewall(UFW) is enabled and running.
-
A Fully Qualified domain name (FQDN) pointing to the server like,
vaultwarden.example.com. -
Everything is updated.
$ sudo apt update && sudo apt upgrade
Step 1 – Configure Firewall
Before installing any packages, the first step is configuring the firewall to allow HTTP and HTTPS connections.
Check the status of the firewall.
$ sudo ufw status
You should see something like the following.
Status: active
To Action From
-- ------ ----
OpenSSH ALLOW Anywhere
OpenSSH (v6) ALLOW Anywhere (v6)
Allow HTTP and HTTPs ports.
$ sudo ufw allow http

$ sudo ufw allow https
Check the status again to confirm.
$ sudo ufw status

Status: active
To Action From
-- ------ ----
OpenSSH ALLOW Anywhere
80/tcp ALLOW Anywhere
443 ALLOW Anywhere
OpenSSH (v6) ALLOW Anywhere (v6)
80/tcp (v6) ALLOW Anywhere (v6)
443 (v6) ALLOW Anywhere (v6)
Step 2 – Install Docker and Docker Compose
Add Docker’s official GPG key.
$ curl -fsSL https://download.docker.com/linux/ubuntu/gpg | sudo gpg --dearmor -o /usr/share/keyrings/docker.gpg
Run the following command to add the Docker repository.
$ echo

"deb [arch=$(dpkg --print-architecture) signed-by=/usr/share/keyrings/docker.gpg] https://download.docker.com/linux/ubuntu

$(lsb_release -cs) stable" | sudo tee /etc/apt/sources.list.d/docker.list > /dev/null
Update the system to include Docker’s repository.
$ sudo apt update
Install Docker.
$ sudo apt-get install docker-ce docker-ce-cli containerd.io docker-compose-plugin
This tutorial will be using the Docker Compose v2 plugin instead of the older legacy binary. Therefore, the command for running it has changed from docker-compose to docker compose and this is reflected here.
Docker runs with elevated privileges so you will need to use sudo frequently to run commands. The better option is to add your Linux user account to the docker user group.
$ sudo usermod -aG docker ${USER}
The ${USER} variable picks up the currently logged-in system account. If you are not logged in with the user you want to give privileges to, replace ${USER} with the username.
To apply for the new group membership, log out of the server and back in, or use the following command. You will be prompted for the user’s password.
$ su - ${USER}
Step 3 – Create Docker Compose File for Vaultwarden
Create a new directory for Vaultwarden.
$ mkdir vaultwarden
Switch to the directory.
$ cd vaultwarden
Create the Docker compose file and open it for editing.
$ nano docker-compose.yml
Paste the following code in it. Replace the DOMAIN and EMAIL variables with the appropriate values.
version: '3'
services:
vaultwarden:
image: vaultwarden/server:latest
container_name: vaultwarden
restart: always
environment:
WEBSOCKET_ENABLED: "true" # Enable WebSocket notifications.
DOMAIN: "https://vaultwarden.example.com"
SMTP_HOST: "<smtp.domain.tld>"
SMTP_FROM: "<[email protected]>"
SMTP_PORT: "587"
SMTP_SECURITY: "starttls"
SMTP_USERNAME: "<username>"
SMTP_PASSWORD: "<password>"
volumes:
- ./vw-data:/data
caddy:
image: caddy:2
container_name: caddy
restart: always
ports:
- 80:80 # Needed for the ACME HTTP-01 challenge.
- 443:443
volumes:
- ./Caddyfile:/etc/caddy/Caddyfile:ro
- ./caddy-config:/config
- ./caddy-data:/data
environment:
DOMAIN: "https://vaultwarden.example.com" # Your domain.
EMAIL: "[email protected]" # The email address to use for ACME registration.
LOG_FILE: "/data/access.log"
Save the file by pressing Ctrl + X and entering Y when prompted.
We are setting up Vaultwarden and the Caddy web server in a single Docker compose file. Let us take a look at all the options defined in the file.
- image refers to the location of the Docker images of Vaultwarden and Caddy on Dockerhub.
- container_name allows you to apply a label to your docker container, for use when referencing the container within a Docker network.
- restart specifies a restart policy for the container. Setting it to always means that a container if exited, will automatically get restarted.
- environment section sets the variables required by Vaultwarden and Caddy. If the SMTP port of your service is 587, set the value of the variable
SMTP_SECURITYtostarttlsand if the SMTP port of your service is 465, set the value of the variableSMTP_SECURITYtoforce_tls. The domain variable is necessary for email verification to work. We have enabled Web sockets for the notifications to work. - volume defines the directories present on the server to store persistent data. The
/vw-datadirectory on the server is mapped to the/datadirectory in the container which stores all the data Vaultwarden requires. In the same way, the location of the Caddy file, Caddy configuration, and caddy’s data are mapped to respective directories in the container. Docker will automatically create the respective directories on the server configured under the Volume section. - ports tell the container to publish ports or a range of ports to the host.
Step 4 – Additional Vaultwarden Configuration
Disabling Registration
If you don’t want your Vaultwarden installation open for user registrations, you can disable it by adding the following variable under the environment section of the Docker compose file.
environment:

WEBSOCKET_ENABLED: "true" # Enable WebSocket notifications.

SIGNUPS_ALLOWED: "false"

....
Disable Invitations
Even after disabling user registrations, an existing user who is part of an organization can still invite new users. To stop that, use the following variable.
INVITATIONS_ALLOWED: "false"
Disable Password Hints
Vaultwarden sends password hints via email and also shows them on the password hint page. To disable the feature, set the value of the SHOW_PASSWORD_HINT variable.
SHOW_PASSWORD_HINT: "false"
Disabling Admin Panel
Vaultwarden hosts static files for its web interface. You can disable this by setting the following variable to false.
WEB_VAULT_ENABLED: "false"
You can override the Vault files by providing your static files to host by using the configuration under the volumes section in the Compose file.
volumes:

- ./vw-data:/data

- /path/to/static/files_directory:/web-vault
Vaultwarden Log
Vaultwarden logs only to standard output. You can configure it to log to a file.
LOG_FILE: "/data/vaultwarden.log"
To reduce the number of log messages, you can set the log level to warn while also setting the variable EXTENDED_LOGGING as true.
LOG_LEVEL: "warn"

EXTENDED_LOGGING: "true"
Step 5 – Create Caddy File for Vaultwarden
Now that we have configured Vaultwarden, let us create a caddy file for Vaultwarden and open it for editing.
$ nano Caddyfile
Paste the following code in it.
{$DOMAIN}:443 {

log {

level INFO

output file {$LOG_FILE} {

roll_size 10MB

roll_keep 10

}

}
# Use the ACME HTTP-01 challenge to get a cert for the configured domain.
tls {$EMAIL}
# This setting may have compatibility issues with some browsers
# (e.g., attachment downloading on Firefox). Try disabling this
# if you encounter issues.
encode gzip
# The file size is set to 500MB to support the Vaultwarden (Bitwarden) Send feature.
request_body {
max_size 500MB
}
header {
# Enable cross-site filter (XSS) and tell browser to block detected attacks
X-XSS-Protection "1; mode=block"
# Disallow the site to be rendered within a frame (clickjacking protection)
X-Frame-Options "DENY"
# Prevent search engines from indexing (optional)
X-Robots-Tag "none"
# Server name removing
-Server
}
# Notifications redirected to the WebSocket server
reverse_proxy /notifications/hub vaultwarden:3012
# Proxy everything else to Rocket
reverse_proxy vaultwarden:80 {
# Send the true remote IP to Rocket, so that vaultwarden can put this in the
# log, so that fail2ban can ban the correct IP.
header_up X-Real-IP {remote_host}
}
}
Save the file by pressing Ctrl + X and entering Y when prompted.
Step 6 – Run Vaultwarden
Start the Vaultwarden Docker container.
$ docker compose up -d
You can check the status of the container using the following command.
$ docker ps
You will get a similar output.
CONTAINER ID IMAGE COMMAND CREATED STATUS PORTS NAMES

4ad23954f1d5 caddy:2 "caddy run --config …" About a minute ago Up About a minute 0.0.0.0:80->80/tcp, :::80->80/tcp, 0.0.0.0:443->443/tcp, :::443->443/tcp, 2019/tcp caddy

d55a037850bc vaultwarden/server:latest "/usr/bin/dumb-init …" About a minute ago Up About a minute (healthy) 80/tcp, 3012/tcp vaultwarden
Step 7 – Use Vaultwarden with Bitwarden Clients
Open the URL https://vaultwarden.example.com in your browser.

The first step is to create an account. Click the Create Account button to proceed.

Enter your account details and click the Submit button to proceed. You will be redirected to the login page. Enter your account details to log in.

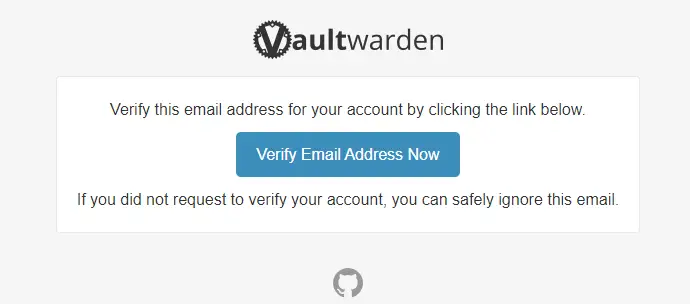
You need to unlock your account’s full features by verifying your email. Click the Send Email button to send the verification mail.
You will get the following mail. Click the link to verify your email address.
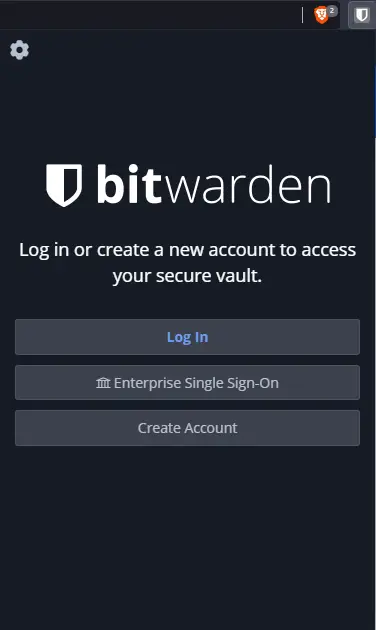
Now that we have our Vaultwarden account ready, it is time to use it with a Bitwarden client. For our tutorial, we are using the Chrome extension. Install it by grabbing it from Bitwarden’s website.
Click on the extension icon to bring out the Vaultwarden sign-in screen.
Click the gear icon on the top left of the popup to bring the advanced settings page. Fill https://vaultwarden.example.com as the server URL.
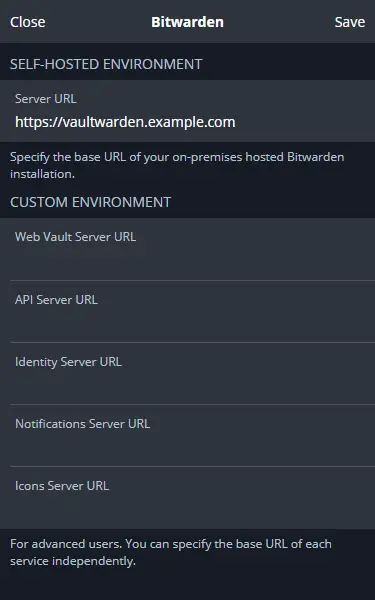
Click the Save button to apply the setting. Log in with your Vaultwarden credentials to log in to the app.
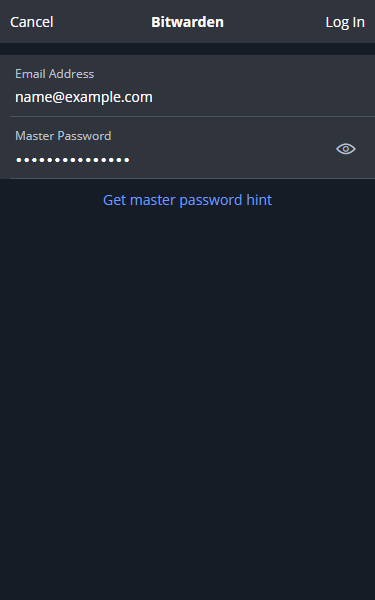
Once logged in, you are taken to the app page and can start using Bitwarden.

Step 8 – Backup Vaultwarden
Vaultwarden stores its data in an SQLite database. One way is to simply copy the .sqlite3 file from the /vw-data folder. But it is not the recommended solution as the database won’t be in a consistent state due to Vaultwarden running. To backup in a reliable way, we will use the SQLite backup command.
Install sqlite3 package.
$ sudo apt install sqlite3
Create a directory for the backups.
$ mkdir ~/vw-backups
Remove the read, write and execute permissions from the group and other users.
$ chmod go-rwx ~/vw-backups
Create the Vaultwarden backups service file and open it for editing.
$ sudo nano /etc/systemd/system/vaultwarden-backup.service
Paste the following code in it.
[Unit]
Description=backup the vaultwarden sqlite database
WorkingDirectory=/home/<username>/vw-backups
ExecStart=/usr/bin/env bash -c 'sqlite3 /home/<username>/vaultwarden/vw-data/db.sqlite3 ".backup backup-$(date -Is | tr : _).sqlite3"'
ExecStart=/usr/bin/find . -type f -mtime +30 -name 'backup*' -delete
Save the file by pressing Ctrl + X and entering Y when prompted.
Start the service to test the service and take a backup.
$ sudo systemctl start vaultwarden-backup.service
Check if the backup file is present.
$ ls -l ~/vw-backups
You should see the listing for the backup file.
total 192

-rw-r--r-- 1 root root 196608 Jul 31 17:25 backup-2022-07-31T17_25_04+00_00.sqlite3
To create a regular schedule for the backups, create and open the systemd timer unit file. You need to make sure the file name matches the file name of the service.
$ sudo nano /etc/systemd/system/vaultwarden-backup.timer
Paste the following code in it.
[Unit]
Description=schedule vaultwarden backups
Persistent=true [Install] WantedBy=multi-user.target
Save the file by pressing Ctrl + X and entering Y when prompted. This will schedule the backup to occur at 4 am daily.
Start and enable the timer unit service.
$ sudo systemctl enable vaultwarden-backup.timer

$ sudo systemctl start vaultwarden-backup.timer
Check the status of the timer service.
$ systemctl status vaultwarden-backup.timer

? vaultwarden-backup.timer - schedule vaultwarden backups

Loaded: loaded (/etc/systemd/system/vaultwarden-backup.timer; enabled; vendor preset: enabled)

Active: active (waiting) since Sun 2022-07-31 17:27:03 UTC; 7s ago

Trigger: Mon 2022-08-01 04:00:00 UTC; 10h left

Triggers: ? vaultwarden-backup.service
Jul 31 17:27:03 vaultwarden systemd[1]: Started schedule vaultwarden backups.
This just backs up the data. You should make sure the database file is backed up regularly offsite or to your local system. To back up the remaining stuff, you can do so by copying everything under the ~/vaultwarden/vw-data folder. Of the remaining stuff, the attachments directory, the config.json file, and the rsa_key* files must be backed up. The sends and the icon_cache directories are optional and should be backed up if they are large enough and you need them. They are strictly optional.
Step 9 – Restore Vaultwarden
To restore the Vaultwarden data, make sure the container is stopped. You can replace everything under the data directory with its backed up version. When restoring the SQLite backup, make sure to delete the existing db.sqlite3-wal file to avoid corruption.
Step 10 – Update Vaultwarden
Upgrading Vaultwarden is a simple step. Switch to Vaultwarden’s Docker compose directory.
$ cd ~/vaultwarden
Next, stop and remove the existing container. Your data will be retained though.
$ docker compose down --remove-orphans
Pull the latest version of the Gitlab docker image.
$ docker compose pull
Start the containers again.
$ docker compose up -d
Your Vaultwarden installation is updated and started again.
Conclusion
This concludes our tutorial on installing and configuring Vaultwarden on a Ubuntu 22.04 server. If you have any questions, post them in the comments below.
Đăng ký liền tay Nhận Ngay Bài Mới
Subscribe ngay
Cám ơn bạn đã đăng ký !
Lỗi đăng ký !
Add Comment