Introduction
MySQL is a popular open-source relational database application, and it is used for many servers worldwide. How you access the database depends on the operating system you use to connect.
This guide walks you through using the Windows Command line to connect to a MySQL database.
Prerequisites
- A Windows-based system with an administrator account.
- A local MySQL installation.
- A text editor (optional).
Starting MySQL from Windows Command Line
The Windows command line, also known as the Command Prompt, is a text-based interface used to execute various system commands and perform administrative tasks. It is one method of connecting to MySQL from Windows.
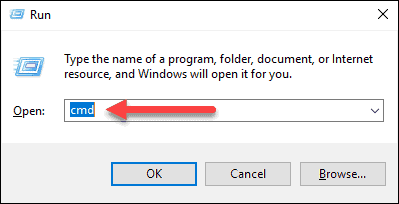
To open the command prompt, hold the Windows key and press R on your keyboard to open the Run command box. Type in cmd and press Enter to open the Windows Command Prompt.
A black command-line interface starts, with white text and a cursor for you to type.

After opening the Command Prompt, follow the steps below to connect to MySQL.
Step 1: Verify MySQL Is Running on Windows
Before connecting, ensure that the MySQL service is running. Follow the steps below:
1. In the Command Prompt, run the following command to display the list of all the running services:
net start
If MySQL is not on the list, you can start it using the Services panel.
2. Use the following command to open Services:
services.mscA new window will launch and display the list of services available on your system.
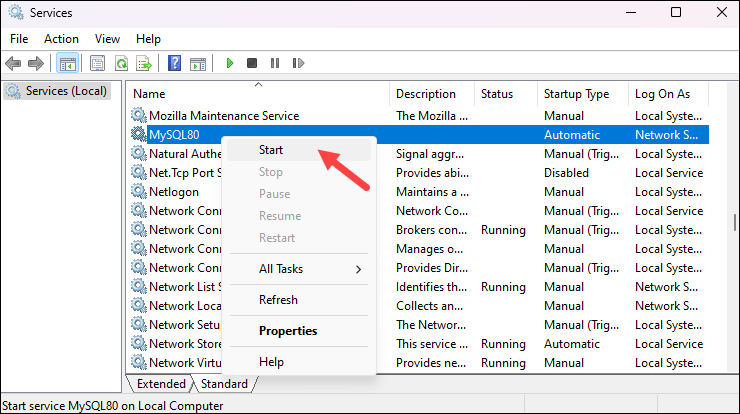
3. Scroll down to find MySQL and check the status column. If the status is Stopped, right-click the MySQL service and select Start to start the service.
Step 2: Run MySQL Server Command-Line Client
The MySQL Server command-line client is a tool that allows users to interact with the MySQL database server using text-based commands. It is similar to the Windows Command Prompt.
To open the MySQL command-line client, press the Windows key and type:
mysql 8.0 command line clientReplace 8.0 with the MySQL version you installed on your system and click the Command Line Client app from the left pane to open it.
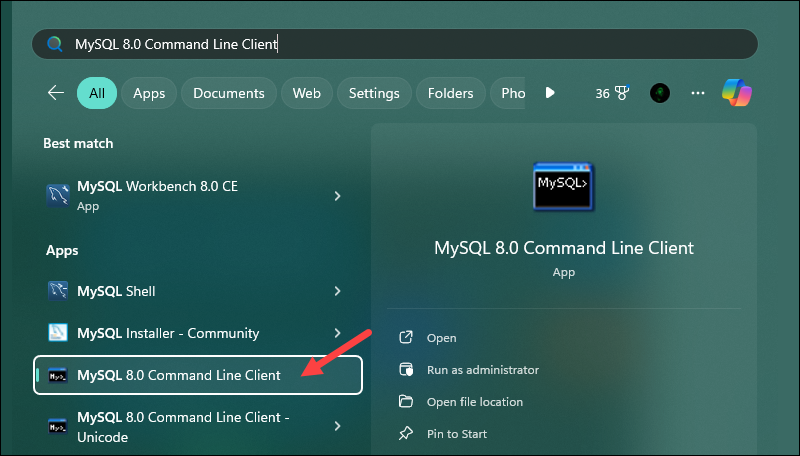
A new window opens, allowing you to enter your administrator password and connect to the MySQL server.
Step 3: Connect to Local MySQL Server
There are two ways to connect to a local MySQL server via the command line:
- Using the dedicated MySQL Command Line Client described in the previous step.
- Using the Windows Command Prompt/Windows PowerShell.
Connect Using the MySQL Command Line Client
Follow the steps outlined in the previous section to open the MySQL Command Line Client and provide your administrator password to log in to the MySQL server:

After connecting, you can start managing your database in the same window.
Connect Using Windows Command Prompt
Open the Windows Command Prompt or Windows PowerShell and use the syntax below to connect to MySQL:
mysql -u [username] -pReplace [username] with the username for your MySQL installation. For example, to log in as root, run the following command:
mysql -u root -p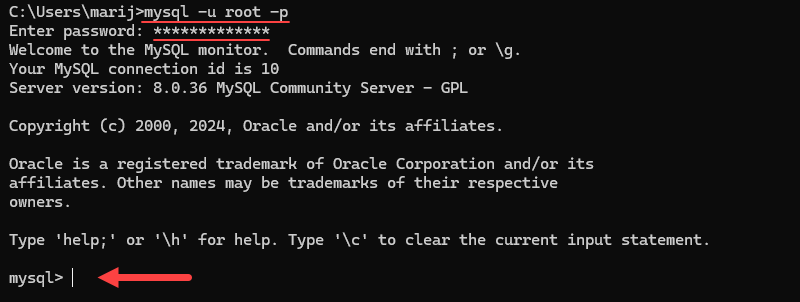
MySQL prompts you for your root password. Enter the password to connect to the MySQL server.
Step 4: Get a List of Databases on MySQL Server
Listing all databases in MySQL provides a clear view of all the databases available on the MySQL server. The action is especially useful in multi-database environments where multiple projects or applications are hosted on the same server.
To list all databases, connect to the MySQL server and run the following command:
SHOW DATABASES;
The command outputs the list of all databases on the MySQL server.
Step 5: How to Select and Edit Database
Selecting a database in MySQL is a key operation that involves choosing a specific database to work with and later making changes to its structure or data. Editing a database involves creating new tables, updating records, optimizing database performance, etc.
Select a Database
To select a database, connect to the MySQL server and use the following syntax:
USE [database_name];For example, to select a database named mysql, run the following command:
USE mysql;
The output states that the database has been changed. After selecting a database, you can start making edits.
Create a Table
To create a new table in MySQL, use the syntax below:
CREATE TABLE table_name (
    id INT AUTO_INCREMENT PRIMARY KEY,
    column1_name DATA_TYPE,
    column2_name DATA_TYPE
);
Replace the table, column names, and data types for the columns according to your needs. For example:
CREATE TABLE users (
id INT AUTO_INCREMENT PRIMARY KEY,
name VARCHAR(100),
email VARCHAR(100),
created_at TIMESTAMP DEFAULT CURRENT_TIMESTAMP
);
The statement creates a table named users with four columns:
id– An auto-incremented integer that serves as the primary key.name– A variable-length string that holds up to 100 characters.email– A variable-length string that holds up to 100 characters.created_at– A timestamp that defaults to the current date and time when a new row is created.
Add Data
After creating a new table, populate it with data. Use the INSERT INTO statement to add data to a table in MySQL. The syntax is:
INSERT INTO table_name (column1, column2, column3, ...) VALUES (value1, value2, value3, ...);For example, to insert data into the table we created above, use the following statement:
INSERT INTO users (name, email) VALUES ('John Doe', '[email protected]');
The statement inserts a new row into the users table with the name column set to John Doe and the email column set to [email protected]. It automatically assigns values to the other columns id and created_at based on their default settings.
Step 6: Create Windows Shortcut to Log in to MySQL
A handy way to quickly log in to your MySQL server in Windows is to create a login shortcut with your credentials and save it as a .bat file. Batch files are often used to automate repetitive tasks and execute multiple commands in sequence.
Follow the steps below to create a login shortcut:
Warning: Create a shortcut only if you are certain that no one else will have access to your computer. Login credentials are sensitive data that unauthorized persons can use to tamper with your MySQL database.
1. Open a text editor such as Notepad.
2. Paste the following:
cmd /K "C:Program FilesMySQLMySQL Server X.Xbinmysql.exe" -u[username] -p[password]- Replace
[username]with the username you want to use to connect and[password]with your login password. - Make sure to change the path from
C:Program FilesMySQLMySQL Server X.Xbinmysql.exeto the actual mysql.exe file location on your system.
3. Press Ctrl+S to launch the Save dialog.
4. Select All files as the file type and type mysql.bat in the name field. Save the shortcut on your desktop (or another place that’s easy to find).
The file is a small Windows executable file you can double-click to log into MySQL using the specified username and password.
Conclusion
After following the steps in this guide, you should be able to connect to a MySQL database using the Windows command line. Once you have logged into the MySQL server, the commands are the same regardless of the system you are using.
Next, see how to tune your MySQL database for the best performance. Alternatively, if you are not a MySQL fan, check out how to use PostgreSQL from the command line.
Đăng ký liền tay Nhận Ngay Bài Mới
Subscribe ngay
Cám ơn bạn đã đăng ký !
Lỗi đăng ký !




Add Comment