


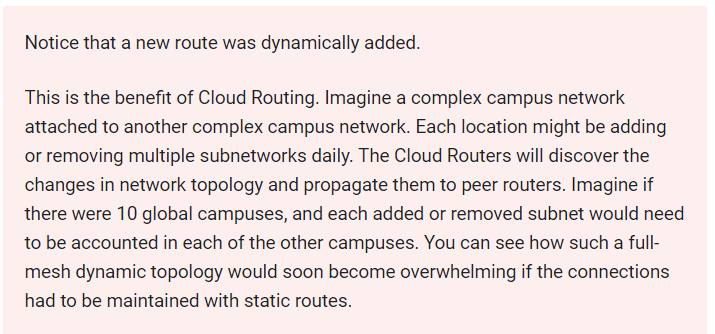
The Cloud Routers will implement VPN gateways configured with Border Gateway Protocol (BGP). BGP provides dynamic network discovery and eliminates the need to configure or maintain static routes. When configuration is complete, you can ping the internal IP of the VM in a newly discovered subnetwork via an auto-populated route.
In this lab, you learn how to perform the following tasks:
- Create two networks to represent your VPC and on-premises network, with a VM in each network to test connectivity
- Connect the two networks using Cloud Routers
- Add a new subnetwork and verify that Dynamic BGP routing is working
Task 1. Create the networks
Create two custom networks with subnetworks, and start micro 1vCPU VMs in each.
Create the first network
- In the Cloud Console, on the Navigation menu > VPC network > VPC networks.
- Click Create VPC Network.
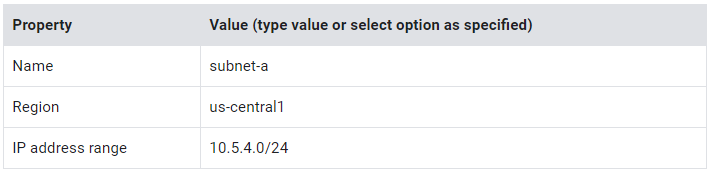
- Specify the following, and leave the remaining settings as their defaults:

4. For Subnet creation mode, click Custom.
5. Specify the following, and leave the remaining settings as their defaults:
6. Click Done.
7. Click Create

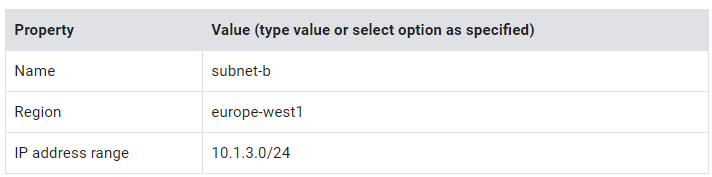
Create the second network
For your second network, you use a different region than the first network.
- Click Create VPC Network.
- Specify the following, and leave the remaining settings as their defaults:

3. For Subnet creation mode, click Custom.
4. Specify the following, and leave the remaining settings as their defaults:
5. Click Done.
6. Click Create.


Task 2. Create the utility VMs
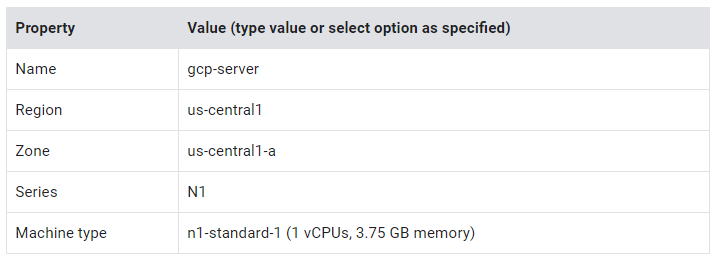
Create the first instance
The first VM is created in the same region as gcp-vpc.
- On the Navigation menu, click Compute Engine > VM instances.
- Click Create.
- Specify the following, and leave the remaining settings as their defaults:
4. Click Management, security, disks, networking, sole tenancy.
5. Click Networking.
6. For Network interfaces, click the Edit icon.
7. Specify the following, and leave the remaining settings as their defaults:

8. Click Done.
9. Click Create.
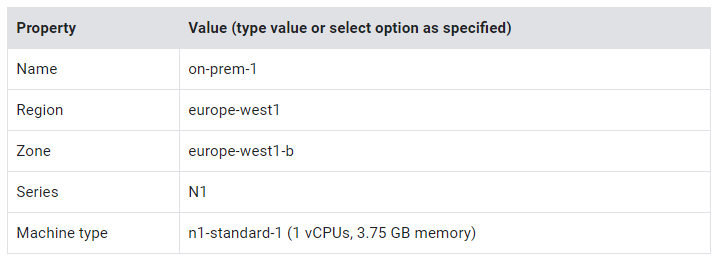
Create the second instance
The second VM is created in the same region as on-prem.
- Click Create Instance.
- Specify the following, and leave the remaining settings as their defaults:
3. Click Management, security, disks, networking, sole tenancy.
4. Click Networking.
5. For Network interfaces, click the Edit icon.
6. Specify the following, and leave the remaining settings as their defaults:

7. Click Done.
8. Click Create.
Task 3. Create the firewall rules
Allow ICMP and SSH into each network.
Allow traffic to gcp-vpc
- On the Navigation menu, click VPC network > Firewall.
- Click Create Firewall Rule.
- Specify the following, and leave the remaining settings as their defaults:
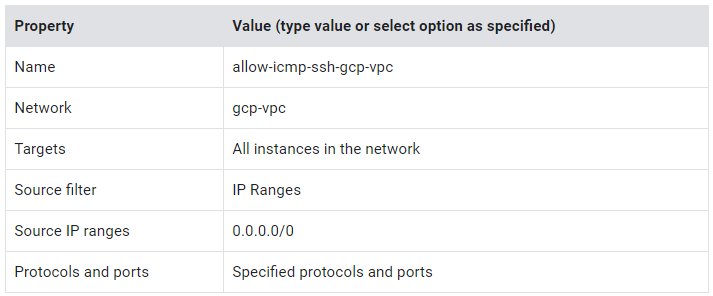
4. For tcp, specify port 22.
5. For Other protocols, specify the icmp protocol.
6. Click Create.

Allow traffic to on-prem
- Click Create Firewall Rule.
- Specify the following, and leave the remaining settings as their defaults:
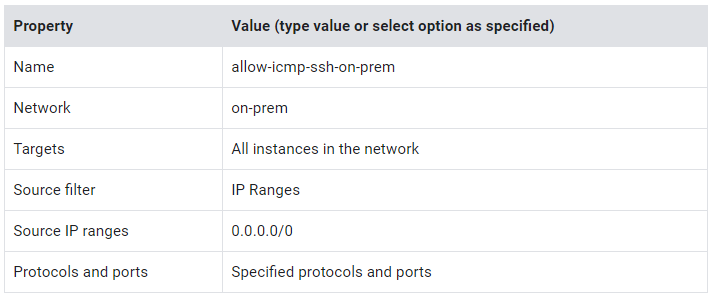
3. For tcp, specify port 22.
4. For Other protocols, specify the icmp protocol.
5. Click Create.

Task 4. Verify network connectivity
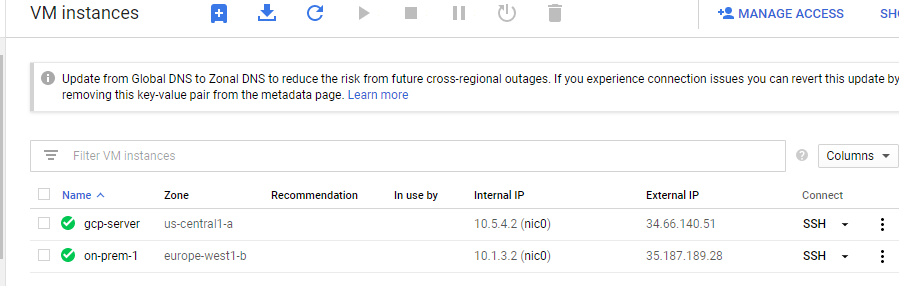
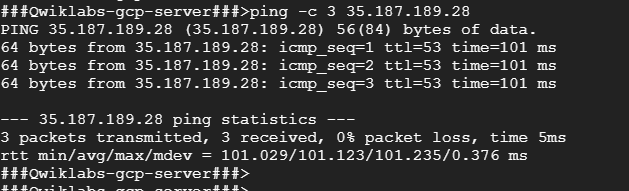
Test connectivity from gcp-server to on-prem-1
- On the Navigation menu, click Compute Engine > VM instances.
- Note the external and internal IP addresses for on-prem-1.
- For gcp-server, click SSH to launch a terminal and connect.
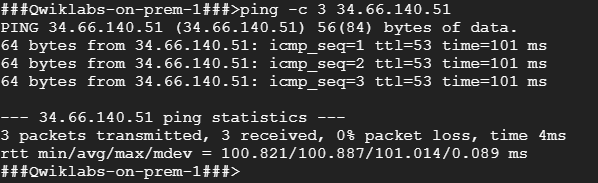
- To test connectivity to on-prem-1’s external IP address, run the following command, replacing on-prem-1’s external IP address with the value noted earlier:
ping -c 3 <Enter on-prem-1’s external IP address here>
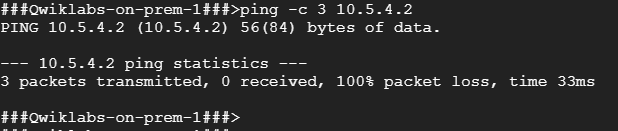
5. To test connectivity to on-prem-1’s internal IP address, run the following command, replacing on-prem-1’s internal IP address with the value noted earlier:
ping -c 3 <Enter on-prem-1’s internal IP address here>
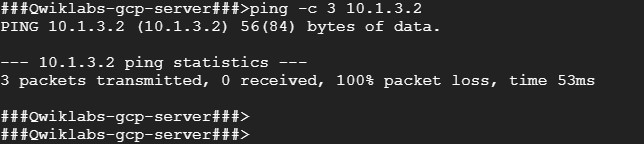
You should see 100% packet loss when pinging the internal IP address.
6. Exit the SSH terminal
Test connectivity from on-prem-1 to gcp-server
- Note the external and internal IP addresses for gcp-server.
- For on-prem-1, click SSH to launch a terminal and connect.
- To test connectivity to gcp-server’s external IP address, run the following command, replacing gcp-server’s external IP address with the value noted earlier:
ping -c 3 <Enter gcp-server’s external IP address here>
4. To test connectivity to gcp-server’s internal IP address, run the following command, replacing gcp-server’s internal IP address with the value noted earlier:
ping -c 3 <Enter gcp-server’s internal IP address here>
You should see similar results.
5. Exit the SSH terminal.
Why are we testing both gcp-server to on-prem-1 and on-prem-1 to gcp-server?
For the purposes of this lab, the path from subnet-a to subnet-b is not the same as the path from subnet-b to subnet-a. We are using separate tunnels to pass traffic in each direction. And if both tunnels are not established, you won’t be able to ping the remote server on its internal IP. The ping might reach the remote server, but the response can’t be returned.
This makes it much easier to debug the lab during class. In practice, a single tunnel could be used with symmetric configuration. However, it is more common to have multiple tunnels or multiple gateways and VPNs for production work because a single tunnel could be a single point of failure.
Task 5. Create the Cloud Routers
Create the gcp-vpc Cloud Router
- In the Cloud Console, on the Navigation menu, click Hybrid Connectivity > Cloud Routers.
2. Click Create router.
3. Specify the following, and leave the remaining settings as their defaults:
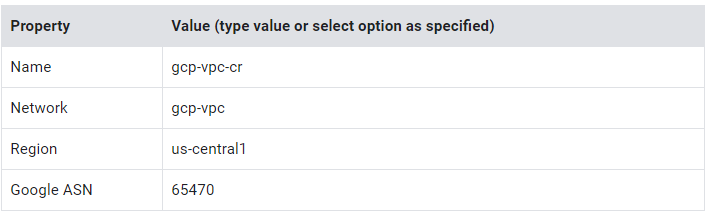
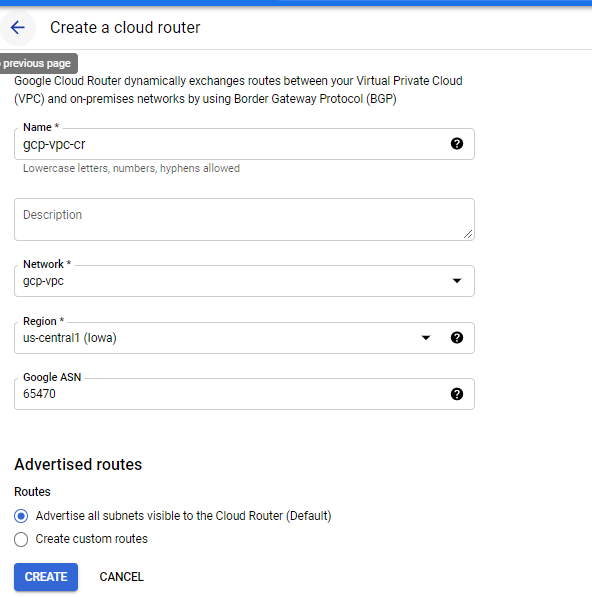
4. Click Create.

Create the on-prem Cloud Router
- Click Create router.
- Specify the following, and leave the remaining settings as their defaults:
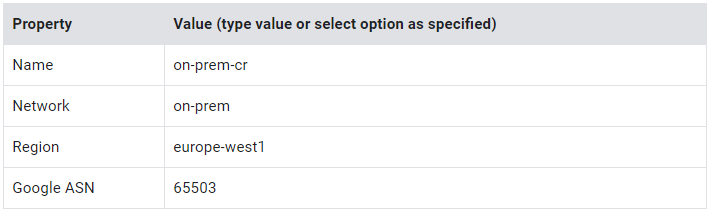
3. Click Create.
Prepare for VPN Gateways configuration
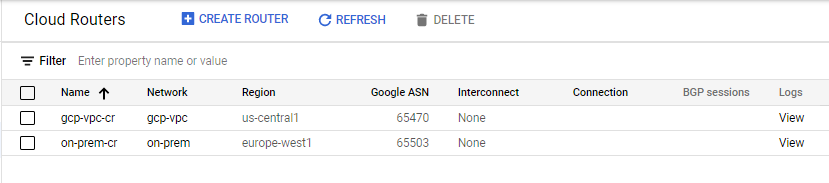
The Cloud Console displays rows labeled gcp-vpc-cr and on-prem-cr with their respective regions.
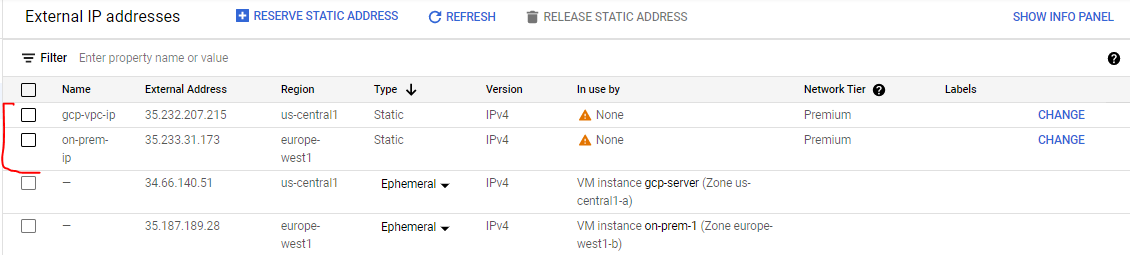
You need a static External IP address for each gateway. Create them now and note the IP addresses. You will use them later in the lab.
- On the Navigation menu, click VPC network > External IP addresses.
- Click Reserve Static Address.
- Specify the following, and leave the remaining settings as their defaults:
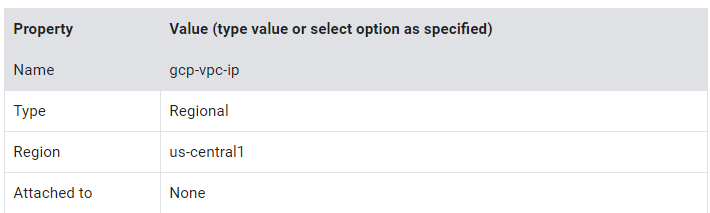

4. Click Reserve.
5. Click Reserve Static Address.
6. Specify the following, and leave the remaining settings as their defaults:
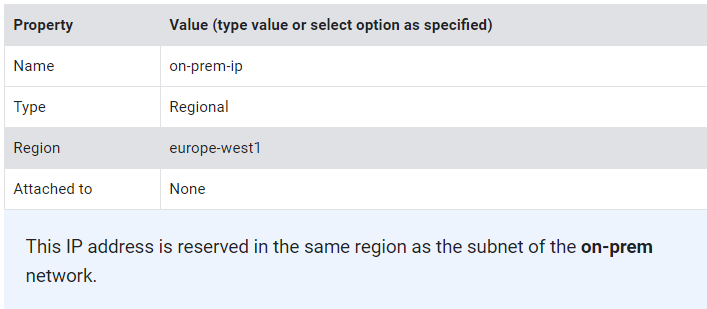
7. Click Reserve.
8. Note both IP addresses. You need to manually enter them in the next steps, where they are referred to as gcp-vpc-ip-address and on-prem-ip-address.
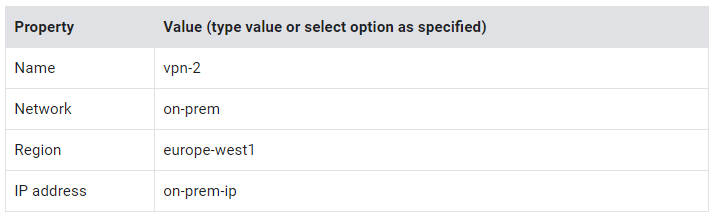
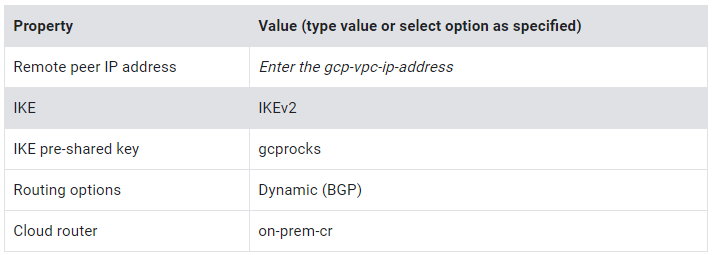
Create the first VPN
- On the Navigation menu, click Hybrid Connectivity > VPN.
- Click Create VPN connection.
- Select
Classic VPNoption and click Continue. - Specify the following, and leave the remaining settings as their defaults:
5. Under Tunnels, specify the following, and leave the remaining settings as their defaults:
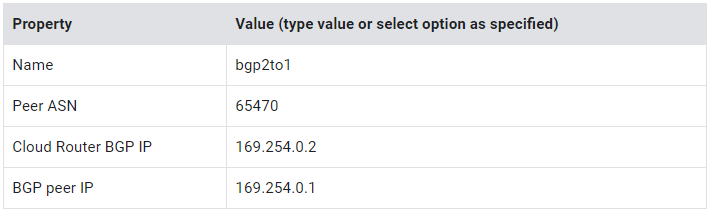
6. For BGP session, click Create BGP session to open a pop-up dialog.
7. Specify the following, and leave the remaining settings as their defaults:

8. Click Save and Continue.
9. Click Done.
10. Click Create.
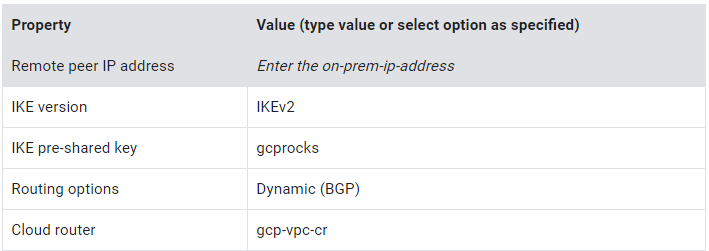
Create the second VPN
- On the Navigation menu, click Hybrid Connectivity > VPN.
- Click VPN Setup Wizard.
- Select
Classic VPNoption in the wizard and click Continue. - Specify the following, and leave the remaining settings as their defaults:
5. Under Tunnels, specify the following, and leave the remaining settings as their defaults:
6. For BGP session, click Create BGP session to open a pop-up dialog.
7. Specify the following, and leave the remaining settings as their defaults:
8. Click Save and Continue.
9. Click Done.
10. Click Create.
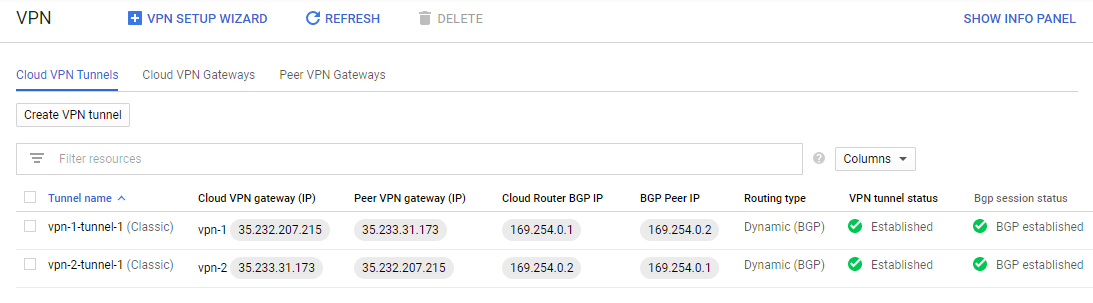
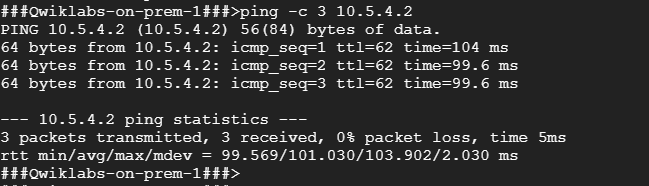
Task 6. Verify connection
- On the Navigation menu, click Compute Engine > VM instances.
- Note the internal IP addresses for gcp-server and on-prem-1.
- For gcp-server, click SSH to launch a terminal and connect.
- To test connectivity to on-prem-1’s internal IP address, run the following command, replacing on-prem-1’s internal IP address with the value noted earlier:
ping -c 3 <Enter on-prem-1’s internal IP address here>
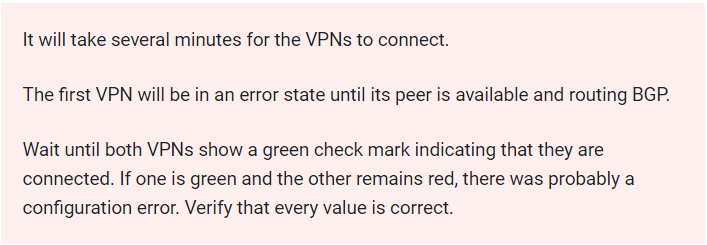
If the ping fails, wait another minute for the VPN tunnels to connect, and ping again.
5. Exit the gcp-server SSH terminal.
6. For on-prem-1, click SSH to launch a terminal and connect.
7. To test connectivity to gcp-server’s internal IP address, run the following command, replacing gcp-server’s internal IP address with the value noted earlier:
ping -c 3 <Enter gcp-server’s internal IP address here>
If the ping fails, wait another minute for the VPN tunnels to connect, and ping again.
Task 7. Demonstrate Dynamic Routing
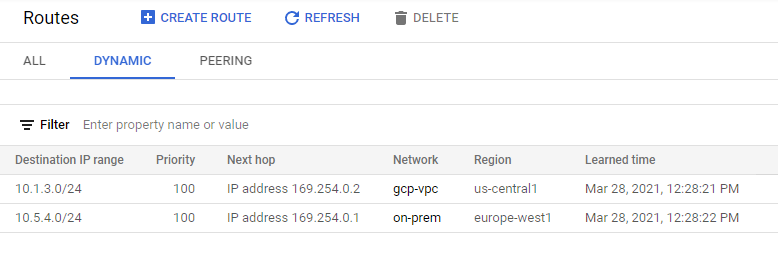
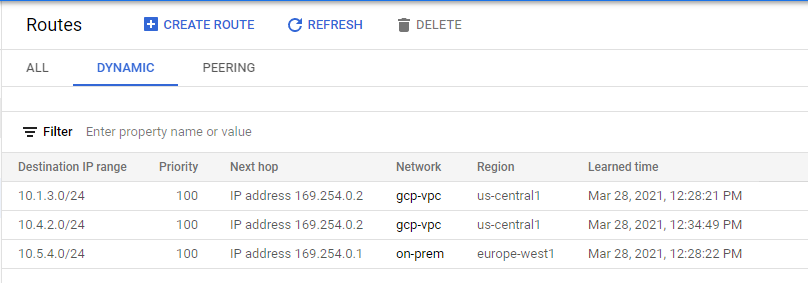
View the current routes
- In the Cloud Console, on the Navigation menu, click VPC network > Routes.
- Click Dynamic to filter.
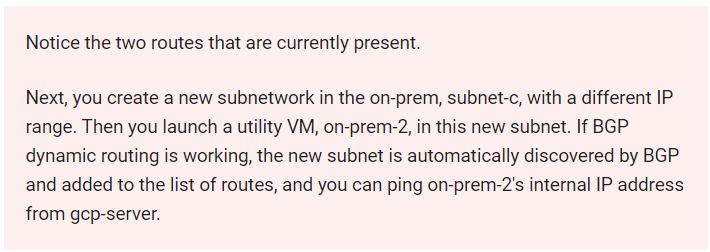
Create a new subnet in on-prem
- On the Navigation menu, click VPC network > VPC networks.
- Click on-prem to filter.
- Click Add subnet.
- Specify the following, and leave the remaining settings as their defaults:
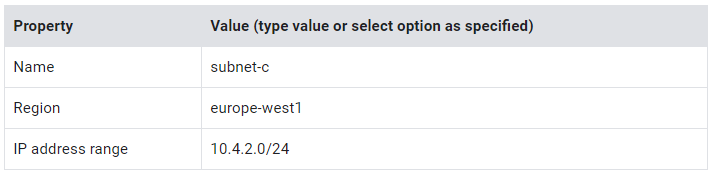
5. This subnet is created in the same region as on-prem. Click Add.

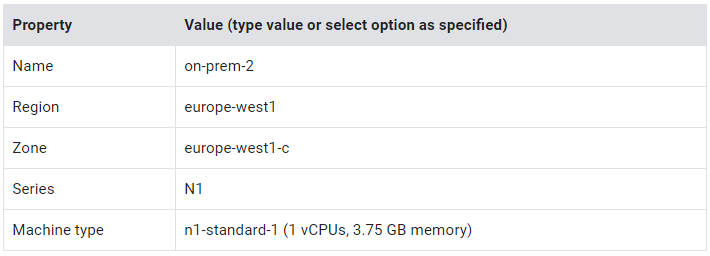
Create a new utility VM in the new subnet
This VM is created in the same region as on-prem.
- On the Navigation menu, click Compute Engine > VM instances.
- Click Create Instance.
- Specify the following, and leave the remaining settings as their defaults:
4. Click Management, security, disks, networking, sole tenancy.
5. Click Networking.
6. For Network interfaces, click the Edit icon.
7. Specify the following, and leave the remaining settings as their defaults:

8. Click Done.
9. Click Create.
Test connectivity
- On the Navigation menu, click Compute Engine > VM instances.
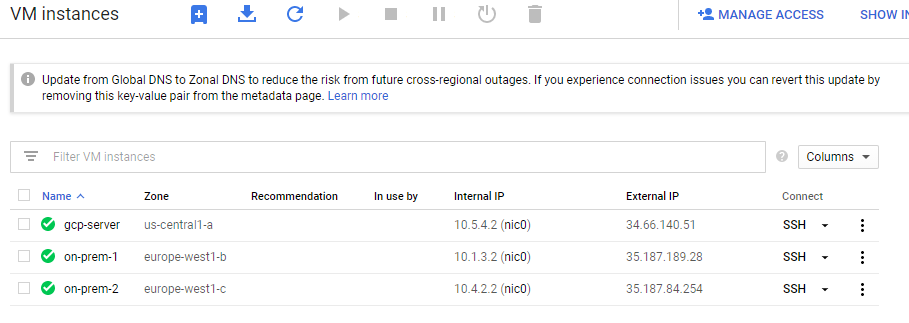
- Note the internal IP address for on-prem-2.
- For gcp-server, click SSH to launch a terminal and connect.
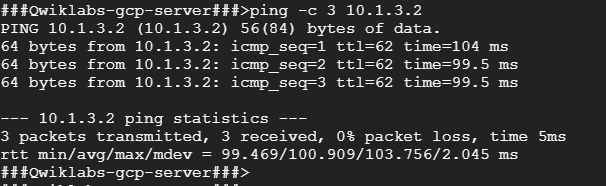
- To test connectivity to on-prem-2’s internal IP address, run the following command, replacing on-prem-2’s internal IP address with the value noted earlier:
ping -c 3 <Enter on-prem-2’s internal IP address here>

If the ping fails, wait another minute for the VPN tunnels to connect and ping again.
5. Exit the gcp-server SSH terminal.
View the routes
- In the Cloud Console, on the Navigation menu, click VPC network > Routes.
- Click Dynamic to filter.
This concludes our Lab for — Establishing Dynamic VPN gateways with Cloud Routers.
Happy Learning !!!
Đăng ký liền tay Nhận Ngay Bài Mới
Subscribe ngay
Cám ơn bạn đã đăng ký !
Lỗi đăng ký !

Add Comment